对于前端开发来说, 请求是日常工作必备的;前端主要通过请求与后端进行交互,特别在前后端分离的模式开发下,请求就更重要了。那么掌握前端发送请求的方式很重要的。那么前端请求常用的方式有哪些呢?具体做业务的时候我们选择什么样的请求方式呢?
from表单
这属于最原始的http请求方式
1
2
3
4
5
6
7
8
9
10
11
12
13
14
15
16
17
18
19
20
21
22
23
24
25
26
27
28
| <!DOCTYPE html>
<html>
<head>
<meta charset="utf-8">
<title>from表单方式</title>
</head>
<body>
<div>
<form action="https://www.fastmock.site/mock/d867c364f89208a7672e9e9d0a822417/qixiao/getFileDetail" method="get">
<div>
<label for="username">账号:</label>
<input id="username" type="text" name="username" placeholder="输入你的名字">
</div>
<div >
<label for="password">密码:</label>
<input id="password" type="password" name="password" placeholder="输入密码">
</div>
<div>
<label>性别:</label>
<input type="radio" name="sex" value="男"> 男
<input type="radio" name="sex" value="女"> 女
</div>
<div>
<input type="submit" value="提交" />
</div>
</form>
</body>
</html>
|
当我们点击提交的时候:

这种方式的请求的整个过程是什么呢?

这种交互方式的缺陷是显而易见的,任何和服务器的交互都是需要刷新页面的,造成的问题就是用户体验很差
这是最原始的一直请求方式, 现在几乎都不会采用这种方式了, 所以这里就不细讲了
Ajax
由于之前的web交互方式是需要刷新页面的, 所以导致用户的体验很差;Ajax的出现解决了这个问题。Ajax全称 Asynchronous JavaScript + XML(异步JavaScript和XML);
Ajax本身不是一种新技术,而是用来描述一种使用现有技术集合实现的一个技术方案,使用Ajax,网页应用能够快速地将增量更新呈现在用户界面上,而不需要重载(刷新)整个页面。
那Ajax这个方案是如何实现的呢?其实Ajax的实现主要是浏览器的XMLHttpRequest(在IE6以下使用ActiveXObject)。 那我们来看看这个原生的XMLHttpRequest的api。
XMLHttpRequest对象
XMLHttpRequest一开始只是微软浏览器提供的一个接口,但是后来各大浏览器也效仿提供了这个接口, 再后来W3C对它进行了标准化,按照标准的前后可以分为两个版本;
XMLHttpRequest 老版本
1
2
3
4
5
6
7
8
9
10
11
12
13
14
15
16
17
18
|
const xhr = new XMLHttpRequest();
xhr.open("GET", "https://www.fastmock.site/mock/d867c364f89208a7672e9e9d0a822417/qixiao/getFileDetail", true);
xhr.send({ name: "shuliqi", age: 18 });
xhr.onreadystatechange = function () {
if (xhr.readyState === 4 ) {
if ( xhr.status === 200 ) {
console.log("请求数据成功:", JSON.parse(xhr.responseText) )
} else {
console.log("请求数据失败:", xhr.statusText );
}
}
}
|
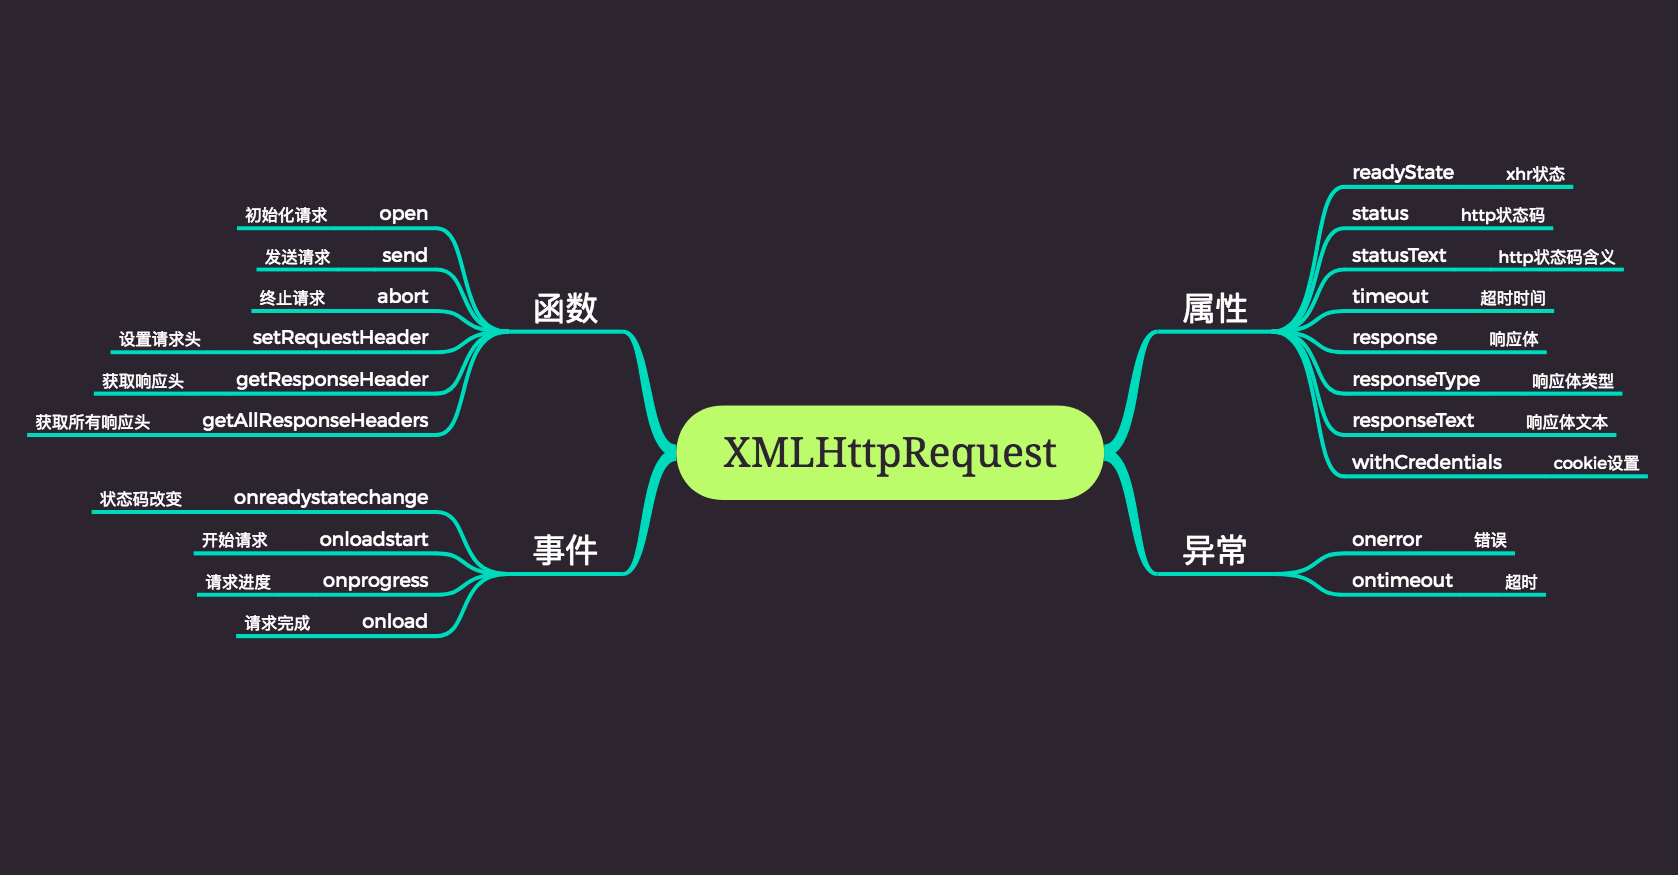
具体的属性说明如下:
readyState: 返回当前 XMLHttpRequest对象当前所处的状态, 有四个状态
- 0:表示代理已被创建,但是尚未调用
open方法
- 1:表示
open已经被调用,在这个状态中可以通过 setRequestHeader()方法来设置请求的头部。
- 2:表示
send()方法已经被调用,响应头也已经被接收
- 3:表示响应了部分结果,但是没有全部响应完
- 4:表示请求操作已经完成,以为着传输已经彻底的完成和失败
status:表示服务器返回的状态码, 等于200表示成功响应responesText: 表示服务器返回的文本数据responseXML:表示服务器返回的XML格式的数据statusText:表示服务器返回的状态文本
由于老版本不是统一的标准,各大浏览器在实现上有一定的差异性,所以存在一些缺陷
- 只支持文本数据的传送,无法用来读取和上传二进制文件
- 传送和和接收数据时,没有进度信息,只能提示没有完成或者已完成
- 受到”同域限制“只能向同一域名的服务器请求数据
例子:
1
2
3
4
5
6
7
8
9
10
11
12
13
14
15
16
17
18
19
20
21
22
23
24
25
26
27
28
29
| <!DOCTYPE html>
<html>
<head>
<meta charset="utf-8">
<title>XMLHttpRequest老版本</title>
</head>
<body>
<script>
const xhr = new XMLHttpRequest();
xhr.open("GET", "https://www.fastmock.site/mock/d867c364f89208a7672e9e9d0a822417/qixiao/getFileDetail", true);
xhr.send({ name: "shuliqi", age: 18 });
xhr.onreadystatechange = function () {
if (xhr.readyState === 4 ) {
if ( xhr.status === 200 ) {
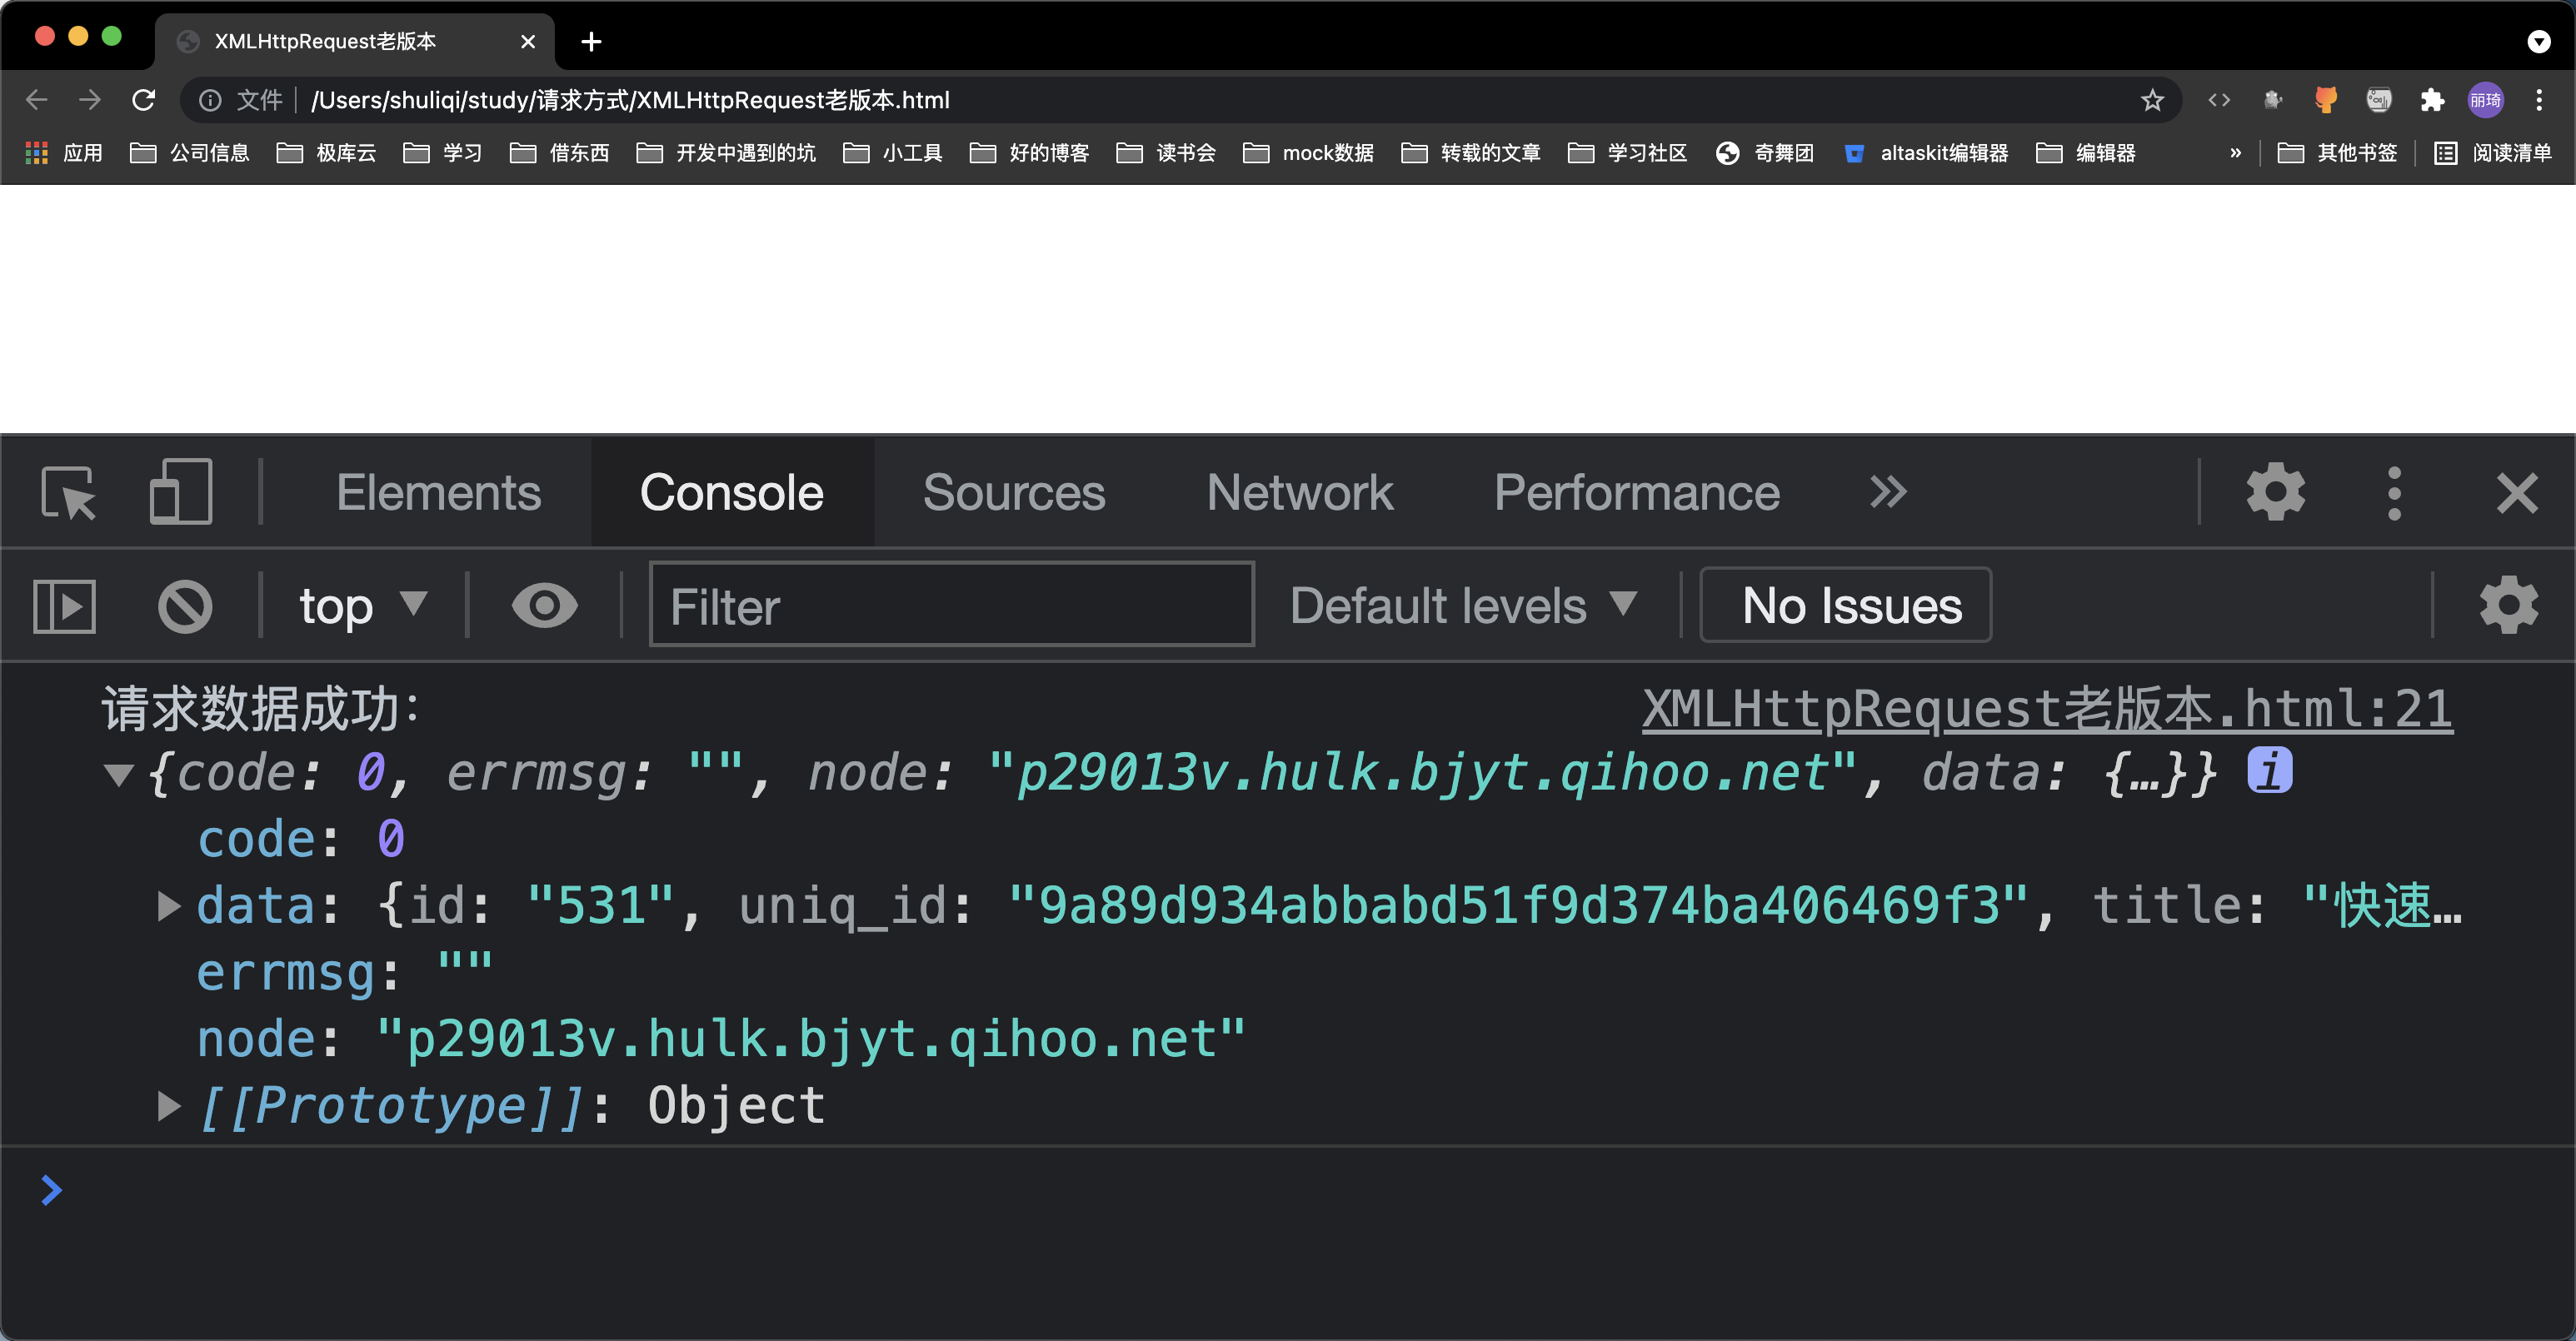
console.log("请求数据成功:", JSON.parse(xhr.responseText) )
} else {
console.log("请求数据失败:", xhr.statusText );
}
}
}
</script>
</body>
</html>
|
打开页面之后,可得到结果:
由以上方式, 我们web是这样工作的:
XMLHttpRequest 新版本
为了更好的使用XMLHttpRequest,w3school发布了标准版本,该版本弥补了老版本的一些缺陷,也是被各大浏览器厂商接受和实现,具体的功能如下:
- 可以设置
http请求的时限
- 可以上传文件
- 可以跨域请求
- 可以获取服务端的二进制数据
- 可以获取数据传输的进度信息
一般为了更加友好的进行兼容各个浏览器,会对浏览器进行判断并进行兼容性模式来获取XMLHttpRequest的对象
1
2
3
4
5
6
7
8
9
10
11
12
13
14
15
16
17
18
19
20
21
22
23
24
25
26
27
28
29
30
31
32
33
34
35
36
37
38
39
40
41
42
43
44
45
46
47
48
49
50
51
52
53
|
let xhr;
if (window.XMLHttpRequest) {
xhr = new XMLHttpRequest();
} else if (window.ActiveXObject) {
try {
xhr = new ActiveXObject('Msxml2.XMLHTTP');
} catch (e) {
try {
xhr = new ActiveXObject('Microsoft.XMLHTTP');
} catch (e) {}
}
}
xhr.onload = () => {
console.log('请求成功', xhr.response);
};
xhr.onloadend = () => {
console.log('请求失败', xhr.response);
};
xhr.onerror = e => {
console.log('请求出错', e);
};
xhr.ontimeout = e => {
console.log('请求超时', e);
};
xhr.onabort = (e) => {
console.log('请求被取消了', e);
}
xhr.timeout = 0;
xhr.open("GET", "https://www.fastmock.site/mock/d867c364f89208a7672e9e9da822417/qixiao/getFileDetail", true);
xhr.responseType = 'json';
xhr.send({ name: "shuliqi", age: 18 });
xhr.abort();
|
例子:
1
2
3
4
5
6
7
8
9
10
11
12
13
14
15
16
17
18
19
20
21
22
23
24
25
26
27
28
29
30
31
32
33
34
35
36
37
38
39
40
41
| <!DOCTYPE html>
<html>
<head>
<meta charset="utf-8">
<title>XMLHttpRequest老版本</title>
</head>
<body>
<script>
let xhr;
if (window.XMLHttpRequest) {
xhr = new XMLHttpRequest();
} else if (window.ActiveXObject) {
try {
xhr = new ActiveXObject('Msxml2.XMLHTTP');
} catch (e) {
try {
xhr = new ActiveXObject('Microsoft.XMLHTTP');
} catch (e) {}
}
}
xhr.onload = () => {
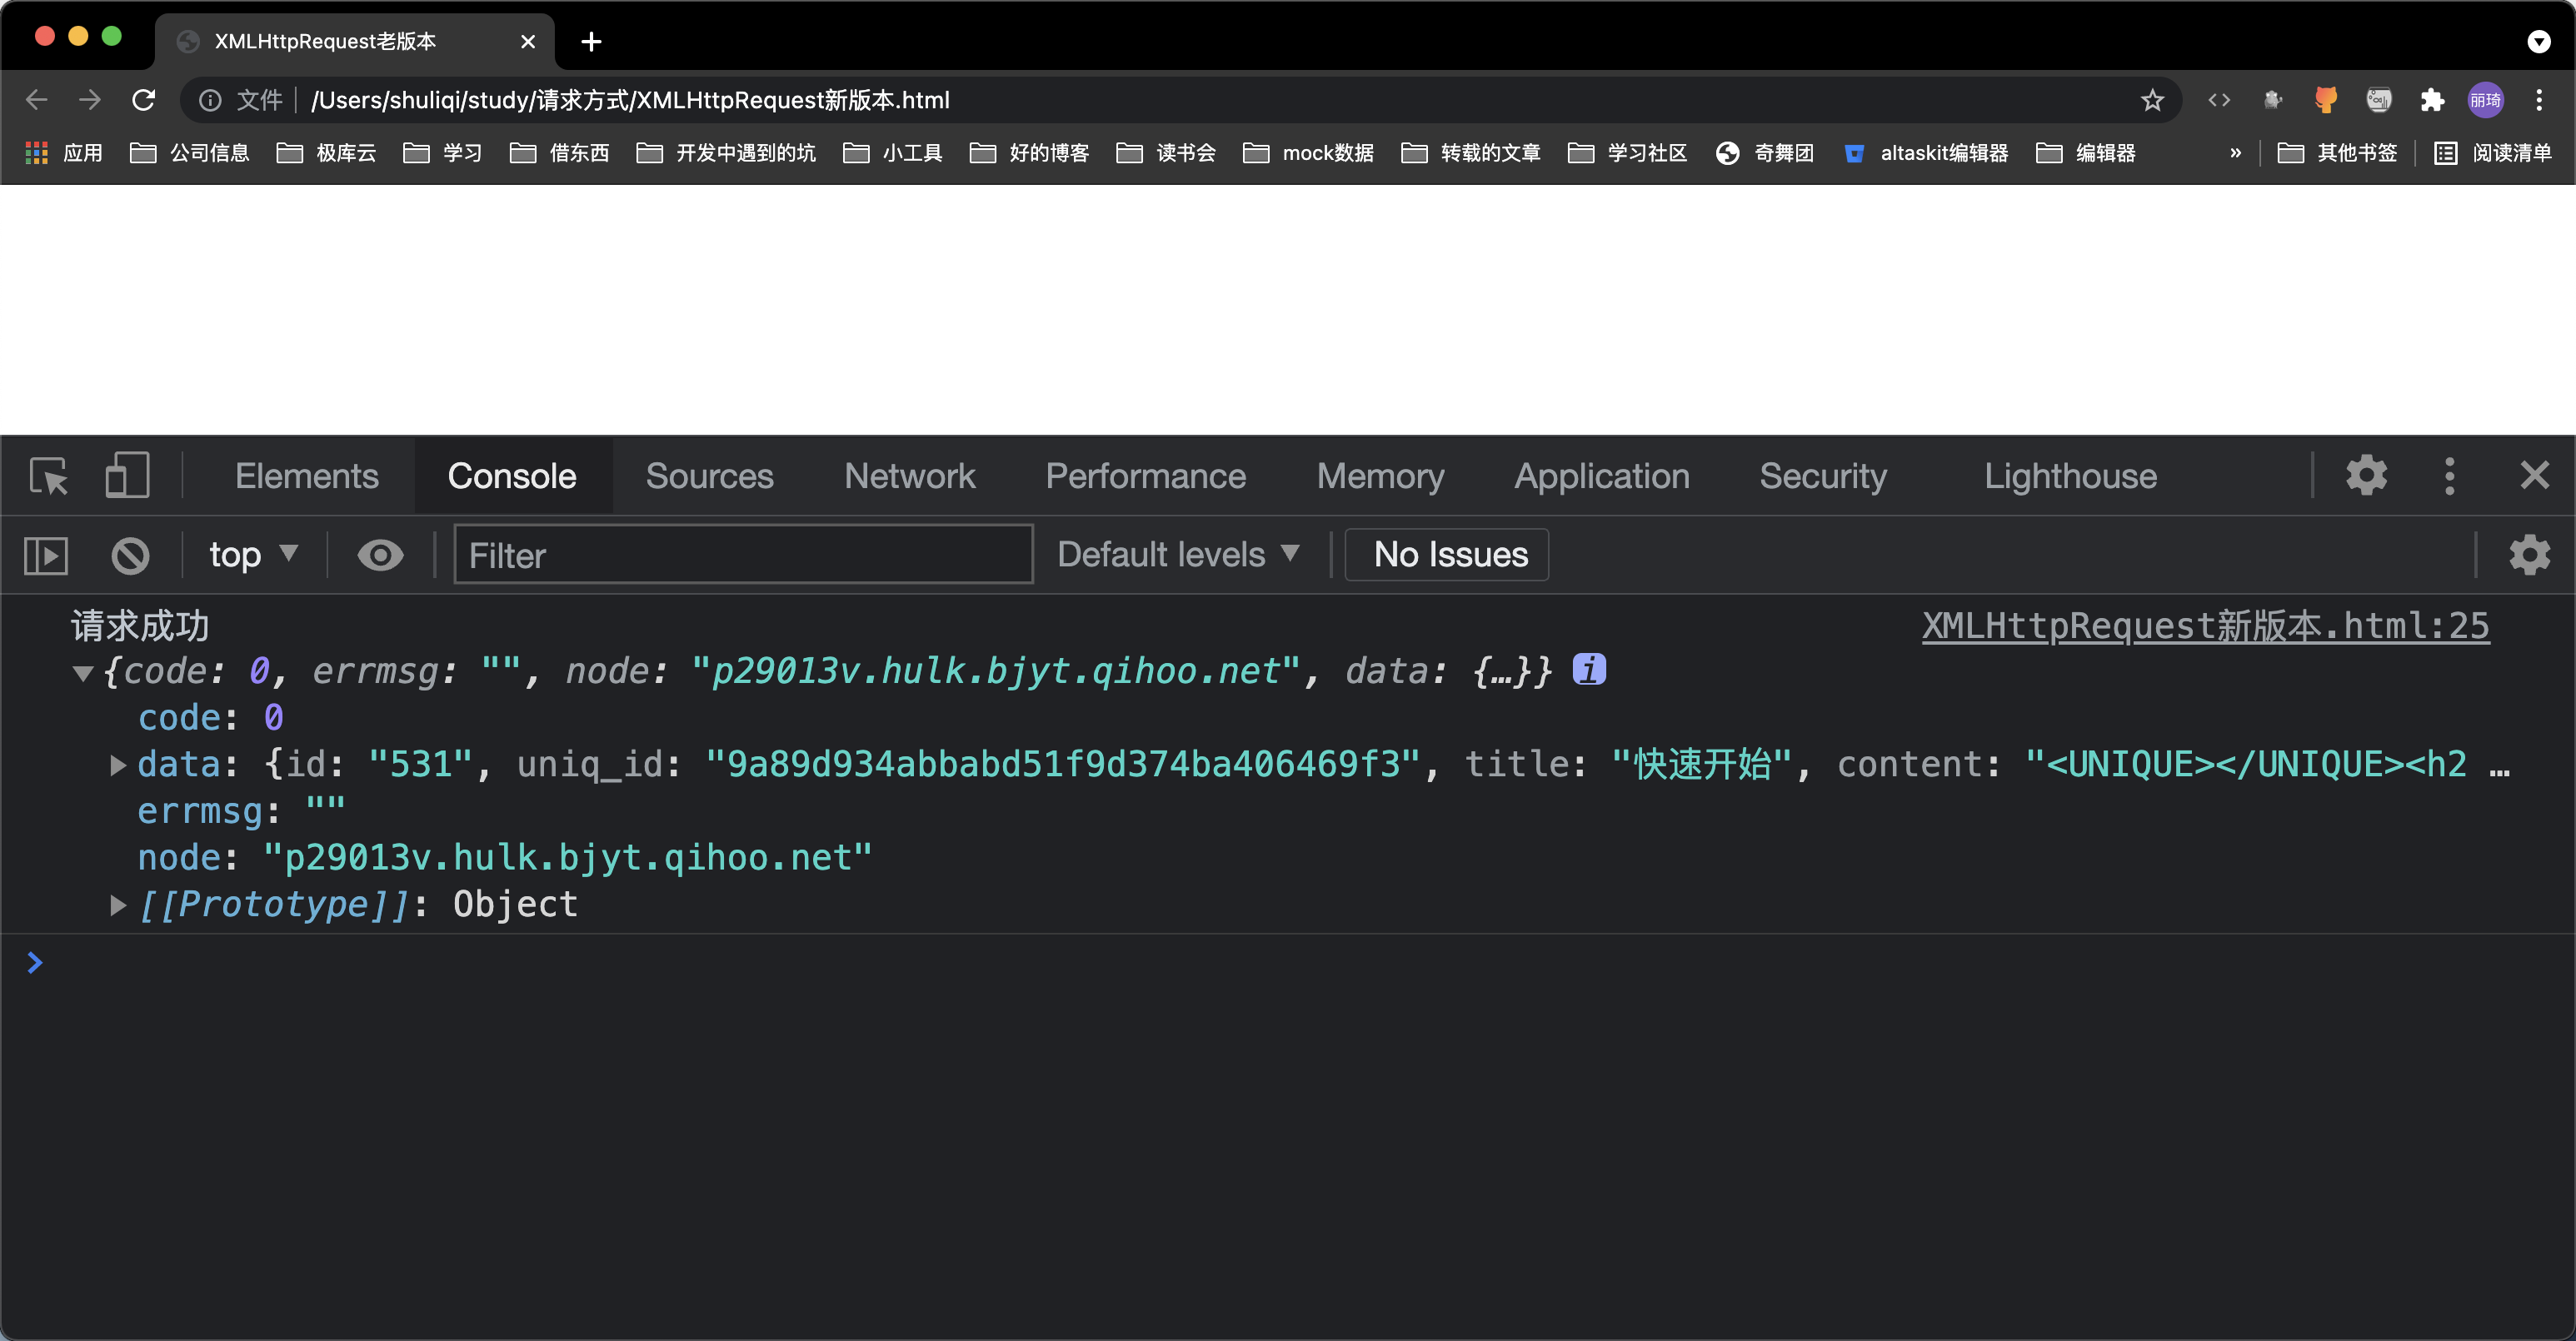
console.log('请求成功', xhr.response);
};
xhr.timeout = 0;
xhr.open("GET", "https://www.fastmock.site/mock/d867c364f89208a7672e9e9d0a822417/qixiao/getFileDetail", true);
xhr.responseType = 'json';
xhr.send({ name: "shuliqi", age: 18 });
</script>
</body>
</html>
|
结果:
最后总结的来说XMLHttpRequest的功能如下:
优点
- 不重新加载页面的情况下更新网页
- 在页面已加载后从服务器请求/接收数据
- 在后台向服务器发送数据
缺点:
- 使用起来也比较繁琐,需要设置很多值。
- 早期的IE浏览器有自己的实现,这样需要写兼容代码。
jQuery
为了更快捷的操作DOM,并且规避了一些浏览器兼容问题,就产生了jQuery。它里面的AJAX请求也兼容了各浏览器,可以有简单易用的方法$.get,$.post。简单点说,就是对XMLHttpRequest对象的封装。
例子:
1
2
3
4
5
6
7
8
9
10
11
12
13
14
15
16
17
18
19
20
21
22
23
24
25
26
| <!DOCTYPE html>
<html>
<head>
<meta charset="utf-8">
<title>jquery封装的ajax</title>
<script src="https://cdn.staticfile.org/jquery/1.10.2/jquery.min.js"></script>
</head>
<body>
<script>
$.ajax({
url:"https://www.fastmock.site/mock/d867c364f89208a7672e9e9d0a822417/qixiao/getFileDetail",
dataType: 'json',
contentType: 'application/json',
headers: {'Content-Type':'application/json' },
xhrFields: { withCredentials: true },
data: JSON.stringify({name: "shuliqi"}),
error:function(xhr,status){
console.log("数据请求失败:", xhr,status);
},
success: function (data) {
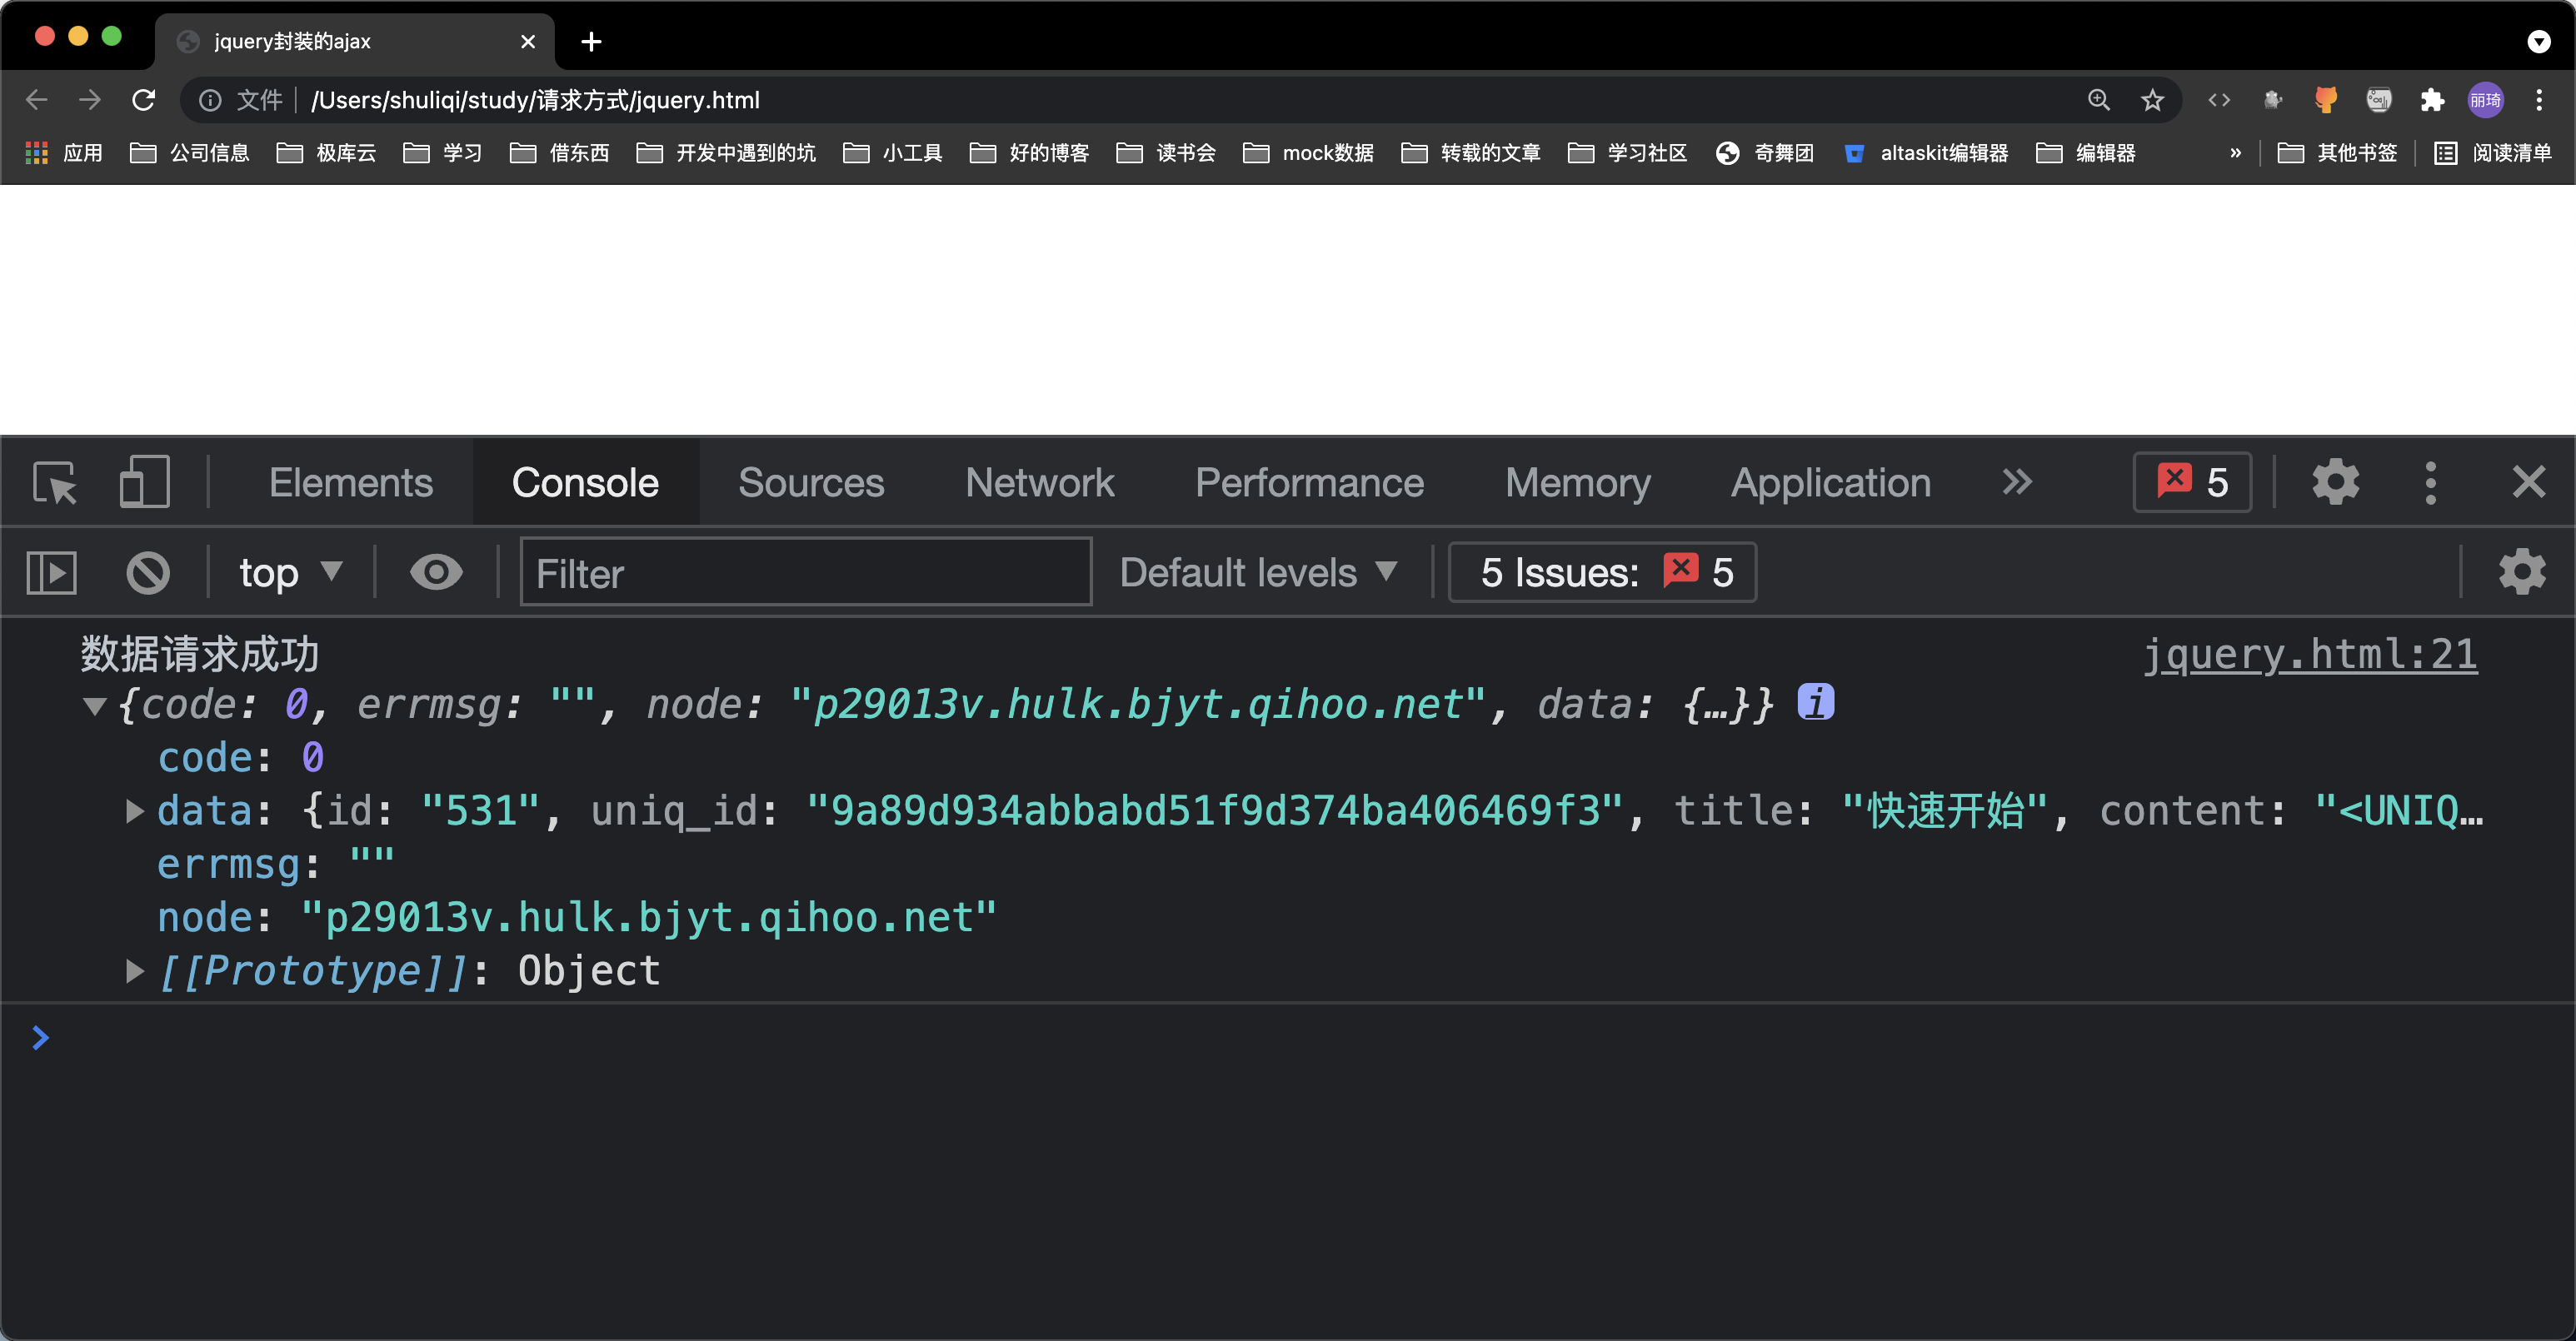
console.log("数据请求成功", data);
}
})
</script>
</body>
</html>
|
结果:
这里也不细讲, 有兴趣或者需要的话可以点击学习jquery官方
优点:
- 对原生
XHR的封装,做了兼容处理,简化了使用。
- 增加了对
JSONP的支持,可以简单处理部分跨域。
缺点:
- 如果有多个请求,并且有依赖关系的话,容易形成回调地狱。
- 本身是针对MVC的编程,不符合现在前端MVVM的浪潮。
- ajax是jQuery中的一个方法。如果只是要使用ajax却要引入整个jQuery非常的不合理。
fetch
fetch提供了一个JavaScript接口,是window的一个函数对象,用于访问网络和操作HTTP管道的部分,例如请求和响应。提供了一个全局的fech()方法,该方法提供了一种简单,合理的方式来跨网络异步获取资源。
fetch是底层的api, 替代了XMLHttpRequest。可以轻松的处理各种格式,非文本化格。而且可以很容易的被其他的技术使用。例如 Service Workers
fetch功能与XMLHttpRequest基本是相同的,但是有三哥主要的差异。
fetch()是使用的Promise,不使用回调函数,因此写法上就大大的简化了fetch()采用模块化的设计,API分散在多个对象上(Response对象,Request对象,Header对象),比输入,输出,状态等API都在XMLHttpRequest对象上更合理一些。fetch()是使用数据流处理数据,可以分开读取,有利于提高网站的性能,减少内存占用,对于请求大文件或者网速慢的场景相当有用。
基本用法
fetch()接受两个参数,第一个参数是一个url,第二个参数是一个配置项。
url是一个字符串,默认向该网址发出get请求,返回一个Promise对象options 是一个对象,用于定制 HTTP 请求
一个基本用法的例子:
1
2
3
4
5
6
7
8
9
10
11
12
13
14
15
16
17
18
| <!DOCTYPE html>
<html>
<head>
<meta charset="utf-8">
<title>fetch()基本用法</title>
</head>
<body>
<script>
fetch("https://www.fastmock.site/mock/d867c364f89208a7672e9e9d0a822417/qixiao/getFileDetail")
.then((response) => {
console.log("数据请求成功:", response.json());
})
.catch((err) => {
console.log("数据请求失败:", err)
})
</script>
</body>
</html>
|
结果:
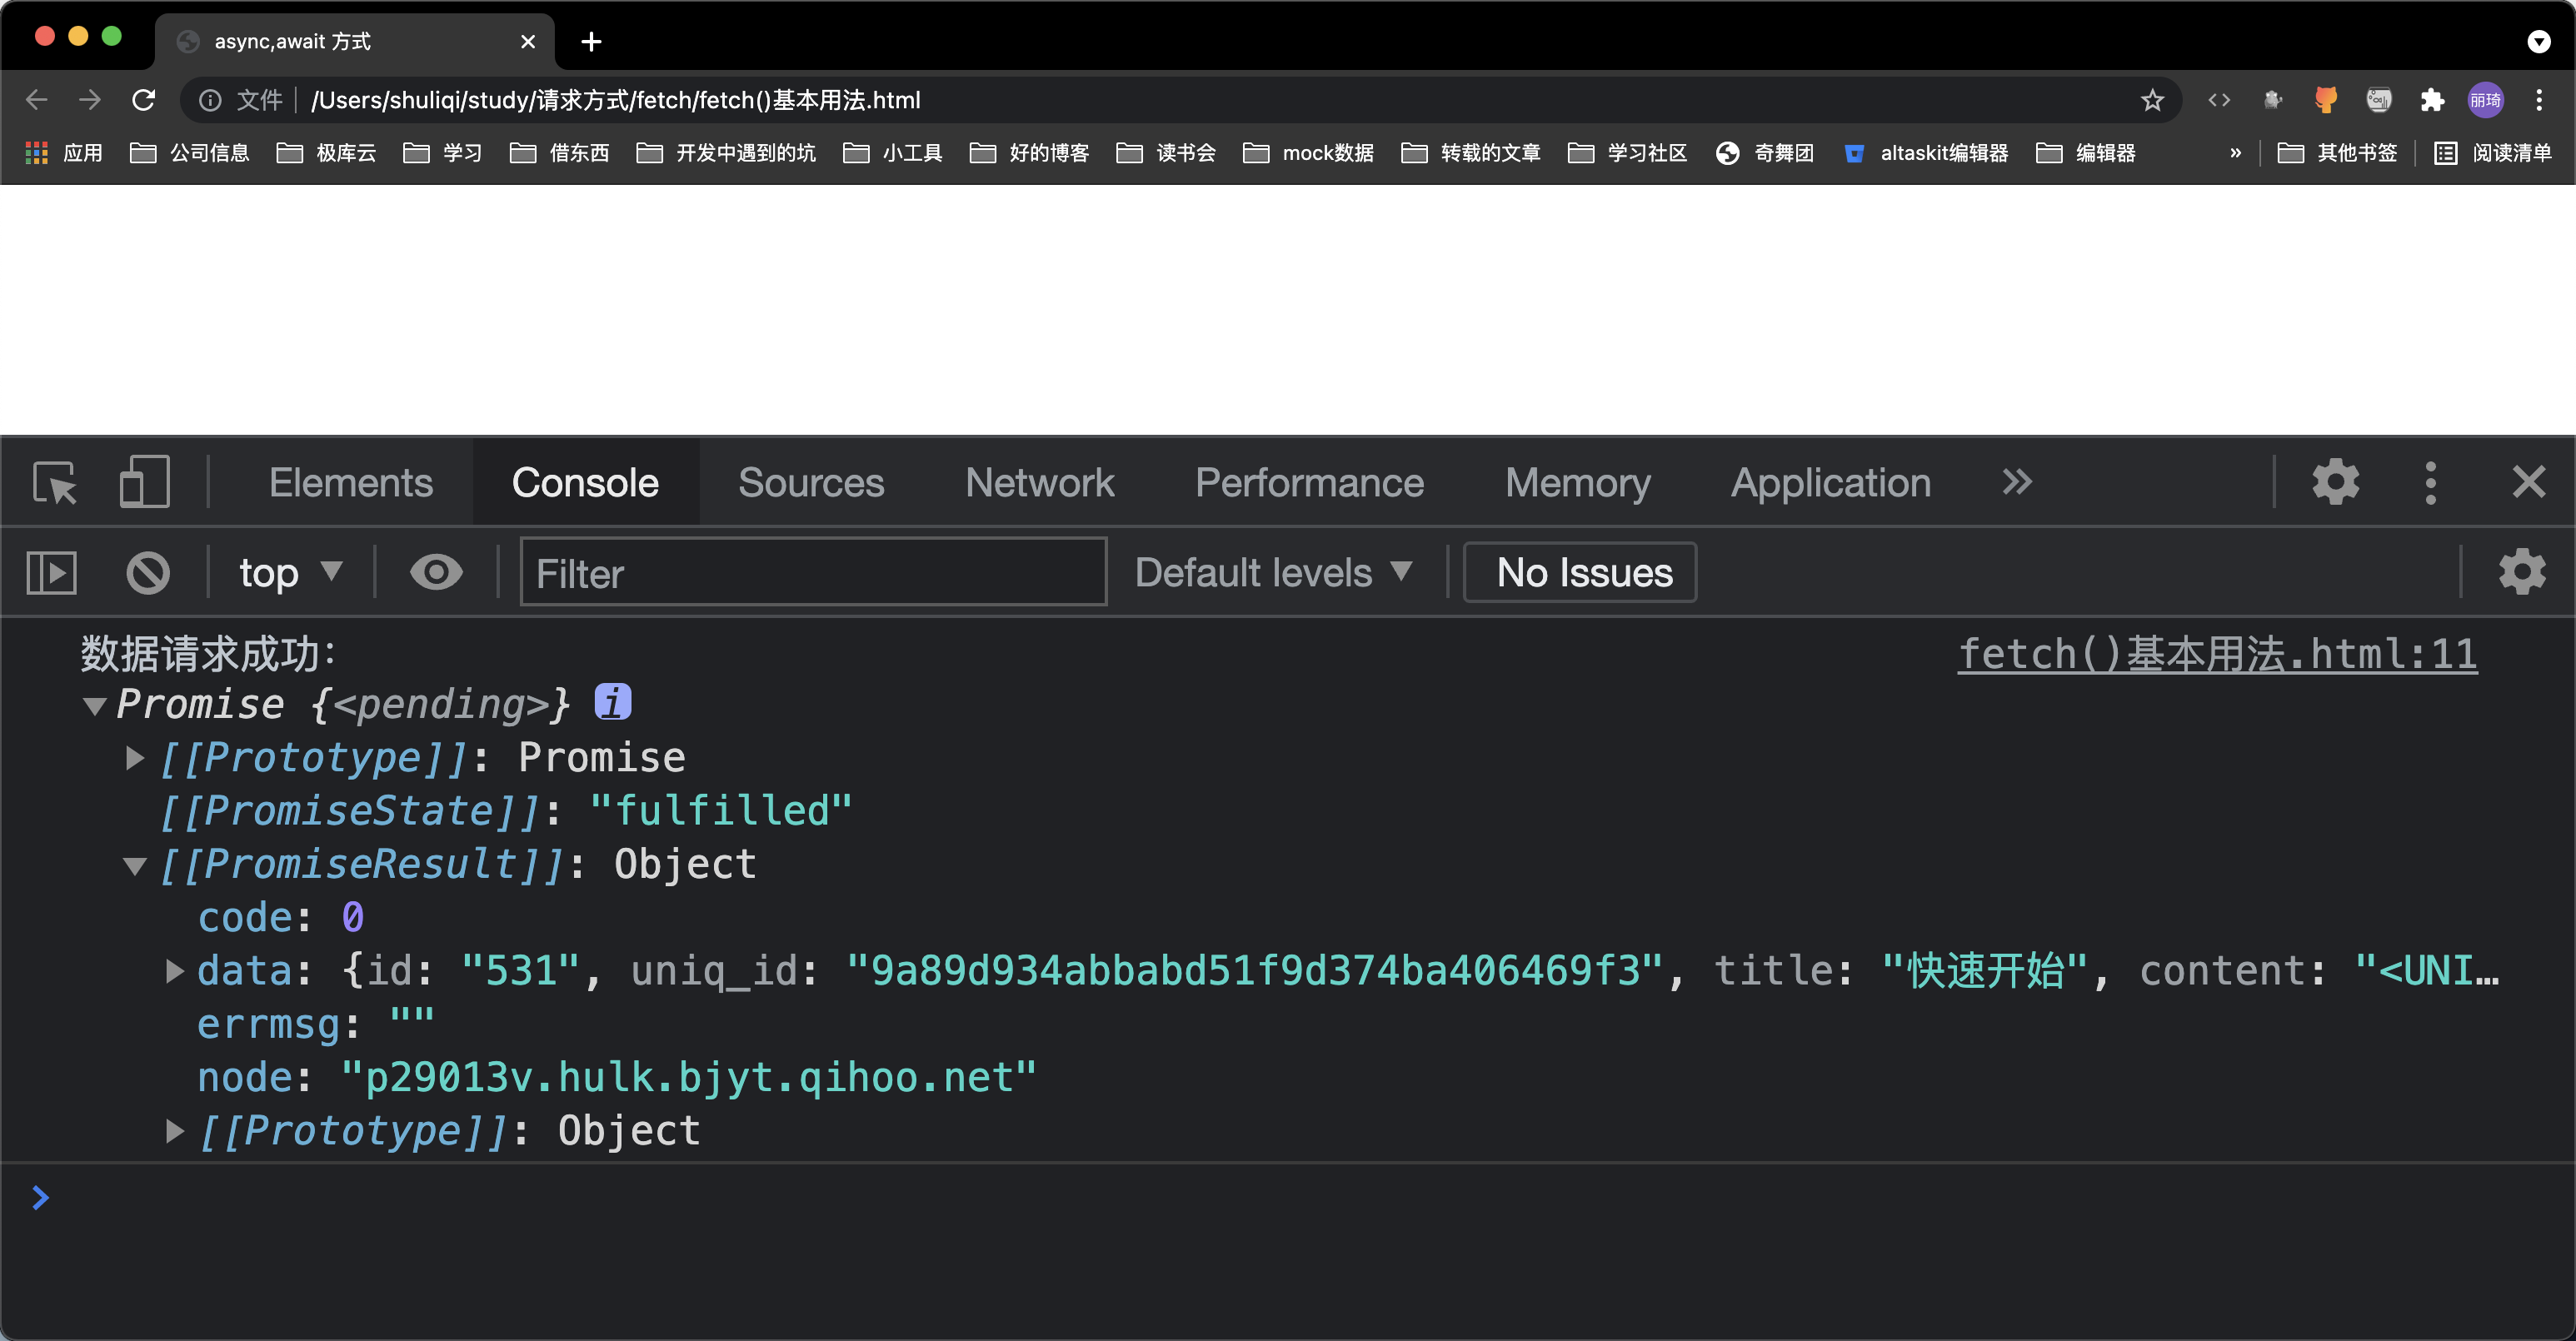
这个例子说明 fetch()接收到Promise的一个Stream 对象,response.json()是一个异步操作,取出所有的内容,,并将其转化为JSON对象。
还可以使用 async/await的语法改写
1
2
3
4
5
6
7
8
9
10
11
12
13
14
15
16
17
18
19
20
| <!DOCTYPE html>
<html>
<head>
<meta charset="utf-8">
<title>fetch()基本用法</title>
</head>
<body>
<script>
async function getData () {
try {
const response = await fetch("https://www.fastmock.site/mock/d867c364f89208a7672e9e9d0a822417/qixiao/getFileDetail");
console.log("数据请求成功:", response.json())
} catch (error) {
console.log("获取数据失败:", err)
}
}
getData();
</script>
</body>
</html>
|
使用async/await需要注意的是 await语句必须放在try...catch里面,这样才能捕获到异步操作中可能发生错误。
Response对象
Response对象主要是处理 HTTP 响应。 fetch()请求成功之后,得到的是一个Response对象,它对应的是服务器HTTP回应。
Response 对象的同步属性
1
| const response = await fetch(url);
|
Response 包含的数据通过 Stream 接口异步读取,但是它还包含一些同步属性,对应 HTTP 回应的标头信息(Headers),可以立即读取
1
2
3
4
5
6
7
8
9
10
11
|
async function getData () {
  try {
    const response = await fetch("https://www.fastmock.site/mock/d867c364f89208a7672e9e9d0a822417/qixiao/getFileDetail");
    console.log("数据请求成功:", response.status, response.statusText)
  } catch (error) {
    console.log("获取数据失败:", err)
  }
}
getData();
|
像这个例子,response.status,response.statusText就是Response的同步属性,是可以立即读取的。
全部的同步属性如下:
Response.ok:
Response.ok属性返回一个布尔值,表示请求是否成功,true对应 HTTP 请求的状态码 200 到 299,false对应其他的状态码。
Response.status
Response.status属性返回一个数字,表示 HTTP 回应的状态码(例如200,表示成功请求)。
Response.statusText
Response.statusText属性返回一个字符串,表示 HTTP 回应的状态信息(例如请求成功以后,服务器返回”OK”)
Response.url
Response.url属性返回请求的 URL。如果 URL 存在跳转,该属性返回的是最终 URL。
Response.type
Response.type属性返回请求的类型。可能的值如下:
| 类型 |
描述 |
| basic |
普通请求,即同源请求 |
| cors |
跨域请求 |
| error |
网络错误,主要用于 Service Worker |
| opaque |
如果fetch()请求的type属性设为no-cors,就会返回这个值,详见请求部分。表示发出的是简单的跨域请求,类似<form>表单的那种跨域请求 |
| opaqueredirect |
如果fetch()请求的redirect属性设为manual,就会返回这个值,详见请求部分 |
Response.redirected
Response.redirected属性返回一个布尔值,表示请求是否发生过跳转
判断请求是否成功
fetch()发出请求以后,有一个很重要的注意点:只有网络错误,或者无法连接时,fetch()才会报错,其他情况都不会报错,而是认为请求成功。
这就是说,即使服务器返回的状态码是 4xx 或 5xx,fetch()也不会报错(即 Promise 不会变为 rejected状态)。
只有通过Response.status属性,得到 HTTP 回应的真实状态码,才能判断请求是否成功。
1
2
3
4
5
6
7
8
9
10
11
12
13
14
15
16
| async function getData () {
try {
const response = await fetch("https://www.fastmock.site/mock/d867c364f89208a7672e9e9d0a822417/qixiao/getFileDetail");
if (response.status >= 200 && response.status < 300) {
const result = await response.json();
console.log("获取数据成功:", result)
} else {
console.log("获取数据失败")
throw new Error(response.statusText);
}
} catch (error) {
console.log("网络错误,或者无法连接时:", err)
}
}
getData();
|
这个例子中,response.status属性只有等于 2xx (200~299),才能认定请求成功。这里不用考虑网址跳转(状态码为 3xx),因为fetch()会将跳转的状态码自动转为 200。
另外一种判断请求是否成功是使用response.ok。判断是否为true。
1
2
3
4
5
6
7
8
9
10
11
12
13
14
15
16
17
18
| async function getData () {
try {
const response = await fetch("https://www.fastmock.site/mock/d867c364f89208a7672e9e9d0a822417/qixiao/getFileDetail");
if (response.ok) {
const result = await response.json();
console.log("获取数据成功:", result)
} else {
console.log("获取数据失败")
throw new Error(response.statusText);
}
} catch (error) {
console.log("网络错误,或者无法连接时:", err)
}
}
getData();
|
Response对象还有一个Response.headers属性, 指向一个Headers对象,对应HTTP响应的所有标头。
Headers对象可以使用for...of来进行循环遍历:
1
2
3
4
5
6
7
8
9
10
11
12
| async function getData () {
try {
const response = await fetch("https://www.fastmock.site/mock/d867c364f89208a7672e9e9d0a822417/qixiao/getFileDetail");
const headers = response.headers;
for (let [key, value] of response.headers) {
console.log(`${key} : ${value}`);
}
} catch (error) {
console.log("获取数据失败:", err)
}
}
getData();
|
结果:
1
| content-type : application/json; charset=utf-8
|
Headers对象还提供了以下方法,用来操作标头
| 方法 |
作用 |
Headers.get() |
根据指定的键名,返回键值 |
Headers.has() |
返回一个布尔值,表示是否包含某个标头 |
Headers.set() |
如果该键名不存在则会添加。 |
Headers.append() |
添加标头 |
Headers.delete() |
删除标头 |
Headers.keys() |
返回一个遍历器,可以依次遍历所有键名 |
Headers.values() |
返回一个遍历器,可以依次遍历所有键值 |
Headers.entries() |
返回一个遍历器,可以依次遍历所有键值对([key, value])。 |
Headers.forEach() |
依次遍历标头,每个标头都会执行一次参数函数 |
上面的这些方法有些是可以修改标头,那是因为继承自Headers接口,对于HTTP响应来说, 修改标头没有很大的意义,而且很多标头都是只读的,浏览器不允许修改。
这些方法中, 最常用的就是response.headers.get(),用于获取某个标头的值。
1
2
3
4
5
6
7
8
9
10
| async function getData () {
try {
const response = await fetch("https://www.fastmock.site/mock/d867c364f89208a7672e9e9d0a822417/qixiao/getFileDetail");
const headers = response.headers;
console.log(headers.get("Content-Type"))
} catch (error) {
console.log("获取数据失败:", err)
}
}
getData();
|
读取内容的方法
Response对象根据服务器返回的不同类型的数据,提供了不同的读取方法。
| 方法 |
作用 |
response.text() |
得到文本字符串 |
response.json() |
得到 JSON 对象。 |
response.blob() |
得到二进制 Blob 对象 |
response.formData() |
得到 FormData 表单对象 |
response.arrayBuffer() |
得到二进制 ArrayBuffer 对象。 |
response.json()上面讲过了,我们再举个response.text()例子:
1
2
3
4
5
6
7
8
9
10
11
12
13
14
15
16
17
18
19
20
21
| <!DOCTYPE html>
<html>
<head>
<meta charset="utf-8">
<title>response.text()读取内容</title>
</head>
<body>
<script>
async function getData () {
try {
const response = await fetch("https://www.fastmock.site/mock/d867c364f89208a7672e9e9d0a822417/qixiao/getFileDetail");
const result = await response.text();
console.log(result);
} catch (error) {
console.log("获取数据失败:", err)
}
}
getData();
</script>
</body>
</html>
|
结果:

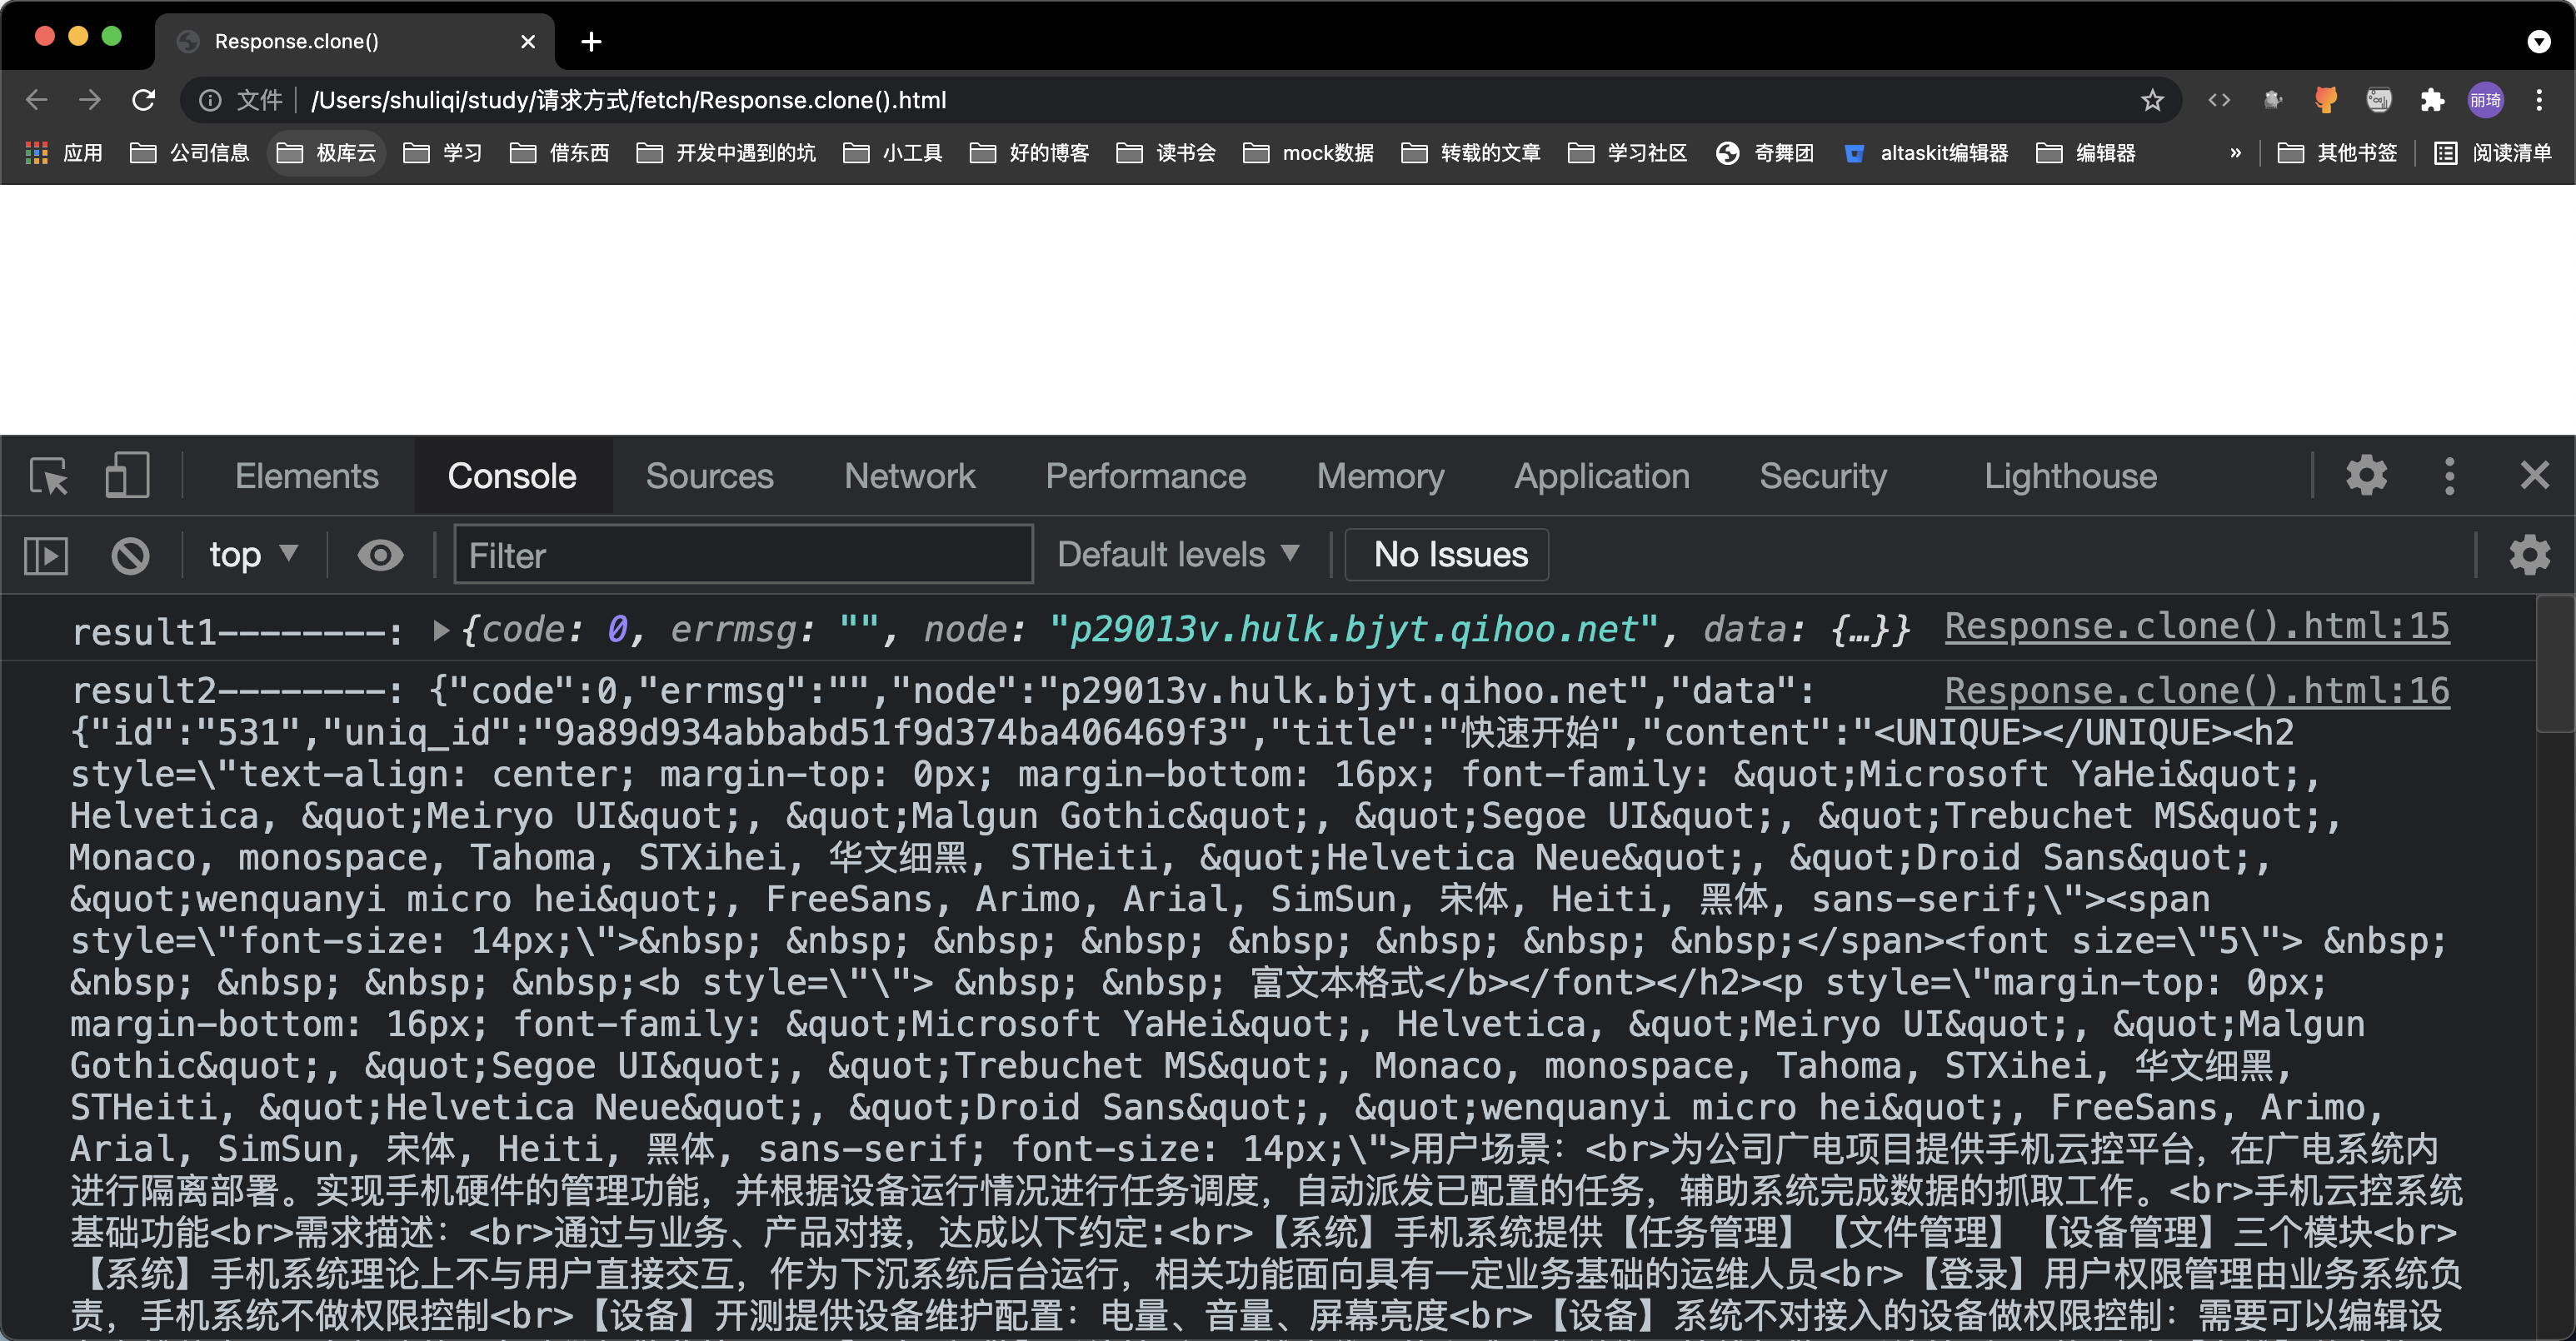
Response.clone()
Stream 对象只能读取一次,读取完就没了。这意味着,前一节的五个读取方法,只能使用一个,否则会报错。
1
2
| let text = await response.text();
let json = await response.json();
|
Response 对象提供Response.clone()方法,创建Response对象的副本,实现多次读取。
1
2
3
4
5
6
7
8
9
10
11
12
13
14
15
16
17
18
19
20
21
22
23
24
| <!DOCTYPE html>
<html>
<head>
<meta charset="utf-8">
<title>Response.clone()</title>
</head>
<body>
<script>
async function getData () {
try {
const response1 = await fetch("https://www.fastmock.site/mock/d867c364f89208a7672e9e9d0a822417/qixiao/getFileDetail");
const response2 = response1.clone();
const result1 = await response1.json();
const result2 = await response2.text();
console.log("result1--------:", result1);
console.log("result2--------:", result2);
} catch (error) {
console.log("获取数据失败:", err)
}
}
getData();
</script>
</body>
</html>
|
结果:
Response.body 属性
Response.body属性是 Response 对象暴露出的底层接口,返回一个 ReadableStream 对象,供用户操作。
它可以用来分块读取内容,应用之一就是显示下载的进度。
1
2
3
4
5
6
7
8
9
10
11
12
13
14
15
16
17
18
19
20
21
22
23
24
25
26
27
| <!DOCTYPE html>
<html>
<head>
<meta charset="utf-8">
<title>Response.body()</title>
</head>
<body>
<script>
async function getData () {
try {
const response = await fetch("https://shuliqi.github.io/2021/06/26/CSS-%E5%AE%9E%E7%8E%B0%E5%8A%A8%E7%94%BB%E8%BE%B9%E6%A1%86%E7%9A%84%E5%A5%87%E6%80%9D%E5%A6%99%E6%83%B3/1.gif");
const reader = response.body.getReader();
while(true) {
const {done, value} = await reader.read();
if (done) {
break;
}
console.log(`Received ${value.length} bytes`)
}
} catch (error) {
console.log("获取数据失败:", err)
}
}
getData();
</script>
</body>
</html>
|
结果:

fetch()配置对象
fetch()的第一个参数是 URL,还可以接受第二个参数,作为配置对象,定制发出的 HTTP 请求。
fetch()第二个参数的完整 API 如下。
1
2
3
4
5
6
7
8
9
10
11
12
13
14
15
16
| const response = fetch(url, {
method: "GET",
headers: {
"Content-Type": "text/plain;charset=UTF-8"
},
body: undefined,
referrer: "about:client",
referrerPolicy: "no-referrer-when-downgrade",
mode: "cors",
credentials: "same-origin",
cache: "default",
redirect: "follow",
integrity: "",
keepalive: false,
signal: undefined
});
|
fetch()请求的底层用的是 Request() 对象的接口,参数完全一样,因此上面的 API 也是Request()的 API。
method:HTTP 请求的方法,POST、DELETE、PUT都在这个属性设置。headers:一个对象,用来定制 HTTP 请求的标头。body:POST 请求的数据体。
1
2
3
4
5
6
7
8
9
10
11
12
|
const response = await fetch(url, {
method: 'POST',
headers: {
"Content-type": "application/x-www-form-urlencoded; charset=UTF-8",
},
body: 'foo=bar&lorem=ipsum',
});
const json = await response.json();
|
注意,有些标头不能通过headers属性设置,比如Content-Length、Cookie、Host等等。它们是由浏览器自动生成,无法修改。
cache
cache属性指定如何处理缓存。可能的取值如下:
default:默认值,先在缓存里面寻找匹配的请求。no-store:直接请求远程服务器,并且不更新缓存。reload:直接请求远程服务器,并且更新缓存。no-cache:将服务器资源跟本地缓存进行比较,有新的版本才使用服务器资源,否则使用缓存。force-cache:缓存优先,只有不存在缓存的情况下,才请求远程服务器。only-if-cached:只检查缓存,如果缓存里面不存在,将返回504错误。
mode
mode属性指定请求的模式。可能的取值如下:
cors:默认值,允许跨域请求。same-origin:只允许同源请求。no-cors:请求方法只限于 GET、POST 和 HEAD,并且只能使用有限的几个简单标头,不能添加跨域的复杂标头,相当于提交表单所能发出的请求。
credentials
credentials属性指定是否发送 Cookie。可能的取值如下:
same-origin:默认值,同源请求时发送 Cookie,跨域请求时不发送。include:不管同源请求,还是跨域请求,一律发送 Cookie。omit:一律不发送。
跨域请求发送 Cookie,需要将credentials属性设为include。
1
2
3
| fetch('http://another.com', {
credentials: "include"
});
|
signal
signal属性指定一个 AbortSignal 实例,用于取消fetch()请求,详见下一节。
keepalive
keepalive属性用于页面卸载时,告诉浏览器在后台保持连接,继续发送数据。
一个典型的场景就是,用户离开网页时,脚本向服务器提交一些用户行为的统计信息。这时,如果不用keepalive属性,数据可能无法发送,因为浏览器已经把页面卸载了。
1
2
3
4
5
6
7
| window.onunload = function() {
fetch('/analytics', {
method: 'POST',
body: "statistics",
keepalive: true
});
};
|
redirect
redirect属性指定 HTTP 跳转的处理方法。可能的取值如下:
follow:默认值,fetch()跟随 HTTP 跳转。error:如果发生跳转,fetch()就报错。manual:fetch()不跟随 HTTP 跳转,但是response.url属性会指向新的 URL,response.redirected属性会变为true,由开发者自己决定后续如何处理跳转。
integrity
integrity属性指定一个哈希值,用于检查 HTTP 回应传回的数据是否等于这个预先设定的哈希值。
比如,下载文件时,检查文件的 SHA-256 哈希值是否相符,确保没有被篡改。
1
2
3
| fetch('http://site.com/file', {
integrity: 'sha256-abcdef'
});
|
referrer
referrer属性用于设定fetch()请求的referer标头。
这个属性可以为任意字符串,也可以设为空字符串(即不发送referer标头)。
1
2
3
| fetch('/page', {
referrer: ''
});
|
referrerPolicy
referrerPolicy属性用于设定Referer标头的规则。可能的取值如下:
no-referrer-when-downgrade:默认值,总是发送Referer标头,除非从 HTTPS 页面请求 HTTP 资源时不发送。no-referrer:不发送Referer标头。origin:Referer标头只包含域名,不包含完整的路径。origin-when-cross-origin:同源请求Referer标头包含完整的路径,跨域请求只包含域名。same-origin:跨域请求不发送Referer,同源请求发送。strict-origin:Referer标头只包含域名,HTTPS 页面请求 HTTP 资源时不发送Referer标头。strict-origin-when-cross-origin:同源请求时Referer标头包含完整路径,跨域请求时只包含域名,HTTPS 页面请求 HTTP 资源时不发送该标头。unsafe-url:不管什么情况,总是发送Referer标头。
取消fetch()请求
fetch()请求发送以后,如果中途想要取消,需要使用AbortController对象。
1
2
3
4
5
6
7
8
9
10
11
12
13
14
15
16
17
18
19
20
21
22
23
24
25
26
27
| <!DOCTYPE html>
<html>
<head>
<meta charset="utf-8">
<title>取消fetch()请求</title>
</head>
<body>
<script>
async function getData () {
const abortController = new AbortController();
const signal = abortController.signal;
try {
const response = await fetch("https://www.fastmock.site/mock/d867c364f89208a7672e9e9d0a822417/qixiao/getFileDetail", {
signal,
});
abortController.abort();
const result = await response.json();
console.log(result);
} catch (error) {
console.log("获取数据失败:", error)
}
}
getData();
</script>
</body>
</html>
|
结果:
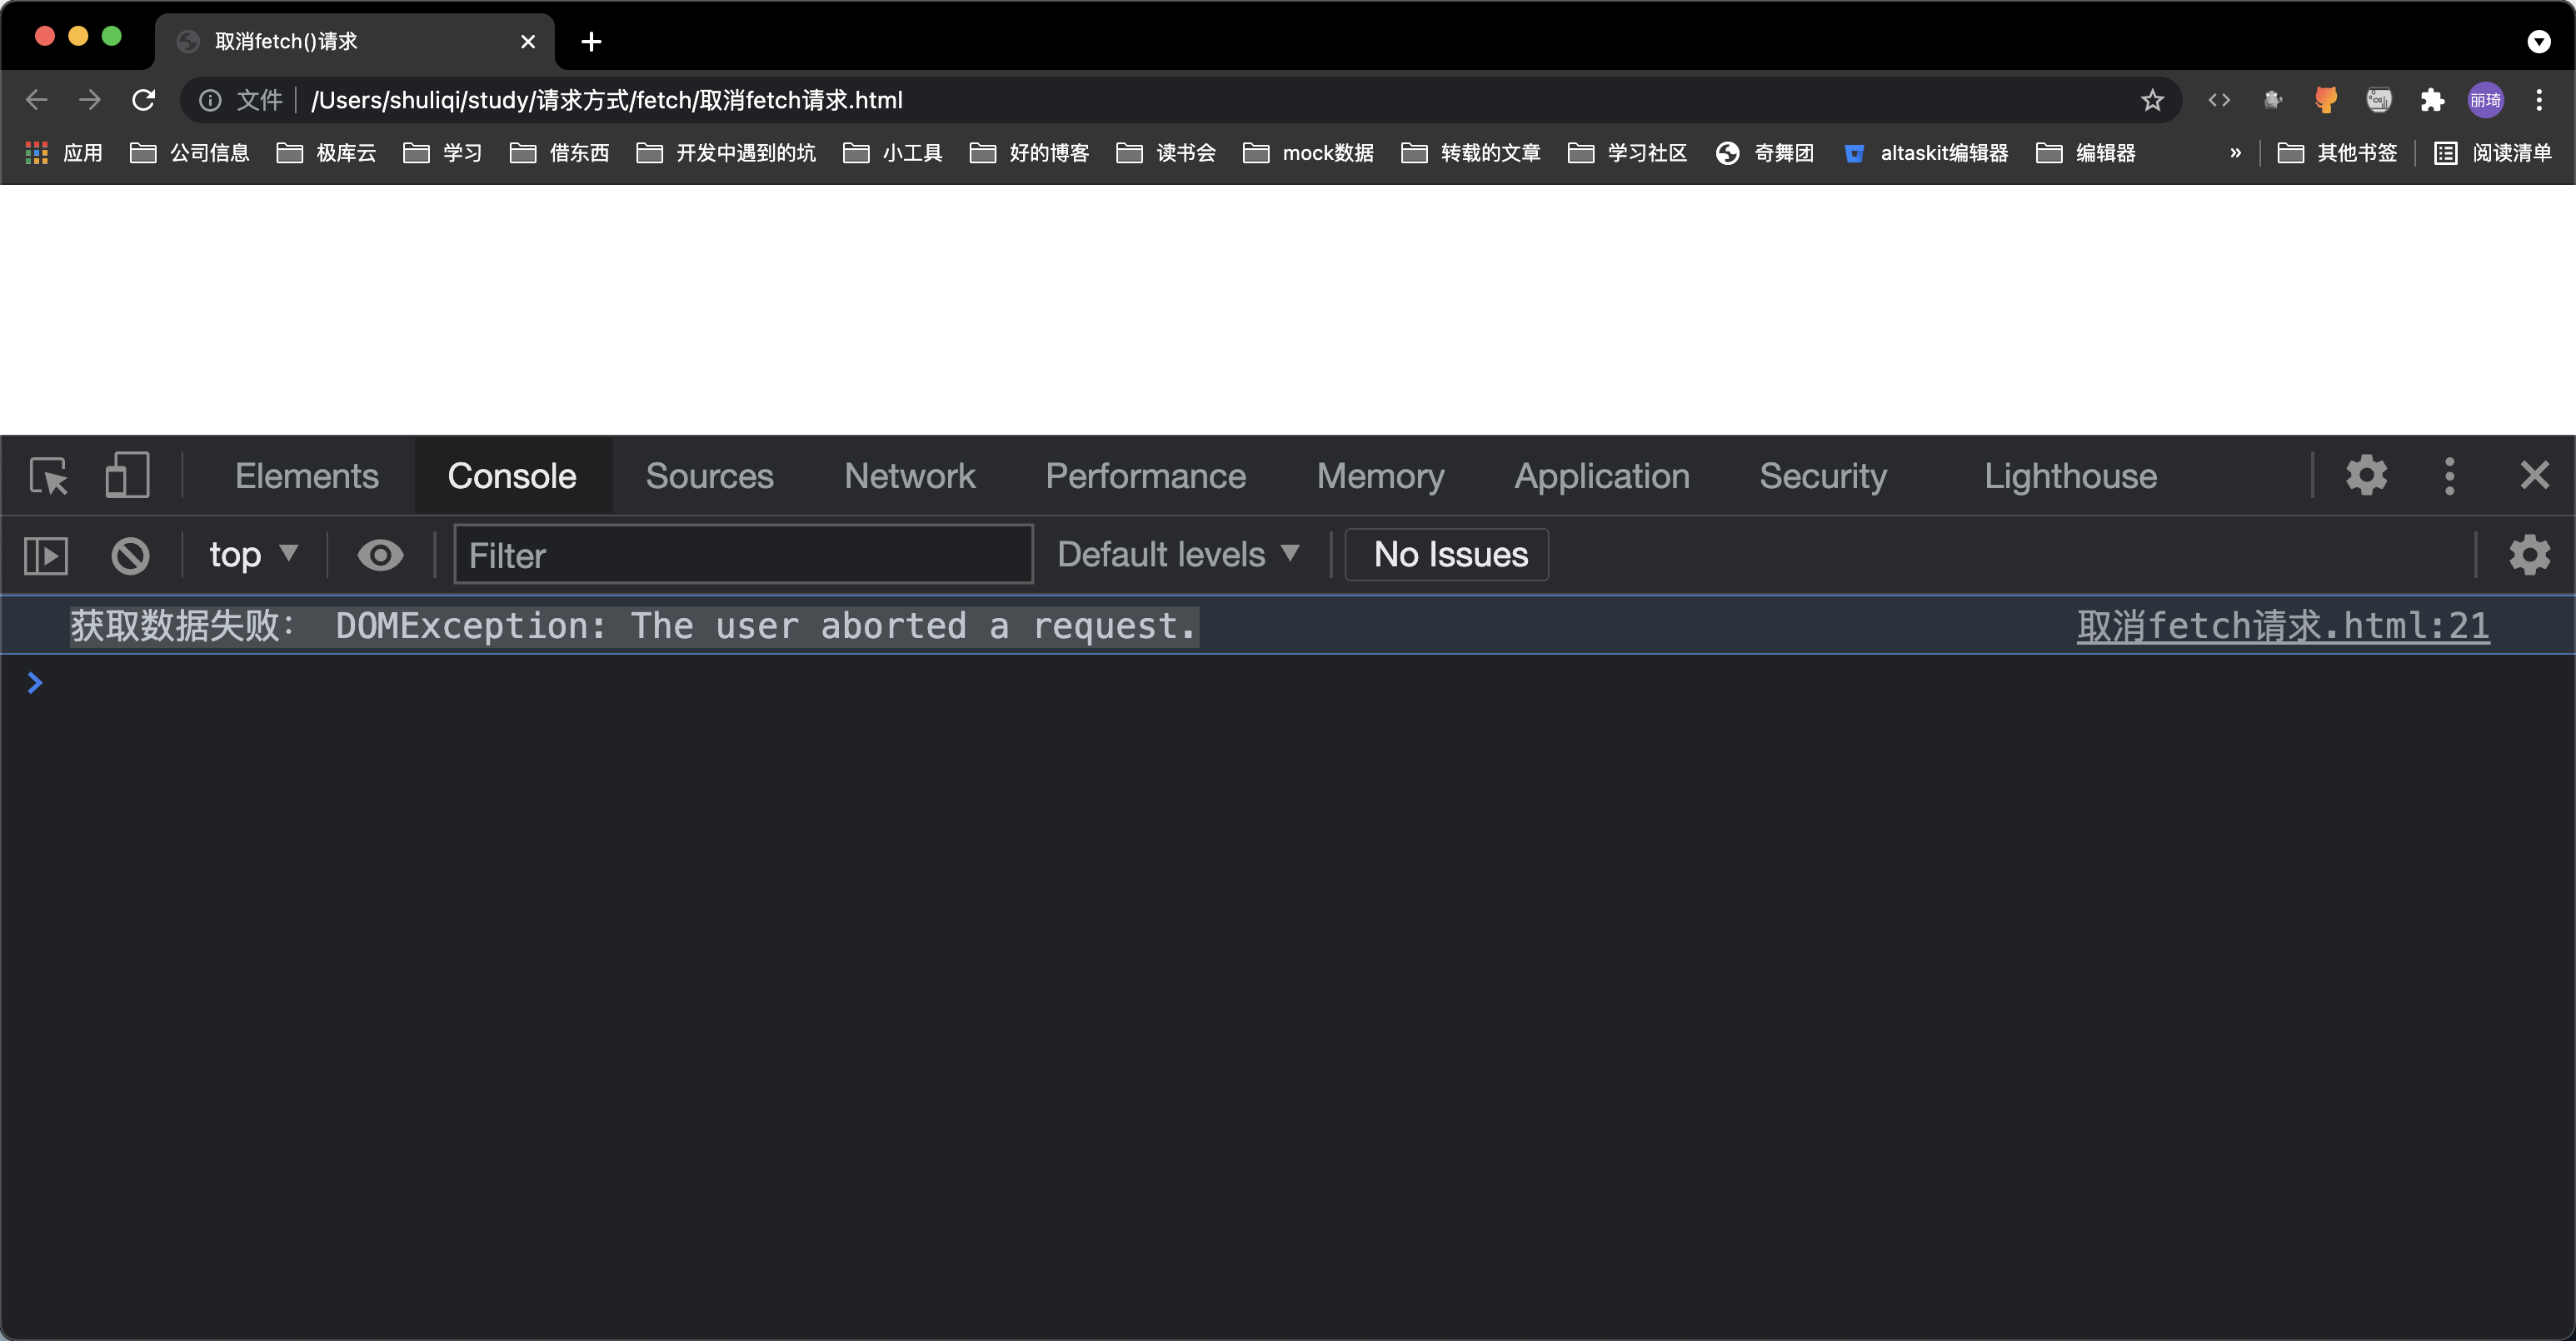
如果我们注释掉 abortController.abort();就可以得到结果的。
优点
对于跨域实现起来就很方便,在配置中,添加mode: ‘no-cors’就可以跨域了
1
2
3
4
5
6
7
| fetch(URL, {
method: 'post',
mode: 'no-cors',
data: {}
}).then(function() {
});
|
缺点
fetch只对网络请求/无法链接报错,对400,500都当做成功的请求,需要封装去处理fetch默认不会带cookie,需要添加配置项。
axios
axios是基于Promise对原生的XMLHttpRequest进行了全面的封装,使用的方式也很优雅。并且也提供了在node环境下的支持。它本质也是对原生XMLHttpRequest的封装,只不过它是Promise的实现版本,符合最新的ES规范。
举个简单的GET请求的官方例子:
1
2
3
4
5
6
7
8
9
10
11
12
13
14
15
16
17
18
19
20
21
|
axios.get('/user?ID=12345')
.then(function (response) {
console.log(response);
})
.catch(function (error) {
console.log(error);
});
axios.get('/user', {
params: {
ID: 12345
}
})
.then(function (response) {
console.log(response);
})
.catch(function (error) {
console.log(error);
})
|
具体的学习可到 axios ,axios中文文档|axios中文网进行学习
优点
- 从浏览器中创建
XMLHttpRequests
- 可在
node.js 中使用
- 支持
Promise API
- 提供了并发请求的接口
- 拦截请求和响应
- 转换请求数据和响应数据
- 取消请求
- 自动转换
JSON 数据
- 客户端支持防御
XSRF
缺点
最后
所有的例子代码有需要的可到 howToSendHttpRequest获取
参考文档:
XMLHttpRequest
全面分析前端的网络请求方式]
前端http请求和常见的几个请求技术做具体的讲解
前端发送http请求的几种常用方法
异步网络请求xhr、ajax、fetch与axios对比
Fetch还是Axios——哪个更适合HTTP请求?
Fetch API 教程