Vue.js 中最强大的功能之一就是组件。而组件实例之间是相互独立的。也就说明了不同的组件之前得数据是不相通的。我们可以先来看看组件之间都存在哪几种关系:

如上图所示。A 和 B,B 和 C,B 和 D 都是父子关系,C 和 D 是兄弟关系。A 和 C,A 和 D都是隔代关系(这里只是隔了一代,但其实业务场景中,可能隔很多代)
那针对不同的使用场景。怎么选择有效的通信方式呢?
方式一:props / $emit
这种方式适合父子关系的的组件。可能也是我们在写代码中最常用到的传递数据的方式了吧。父级组件通过props向子组件传递。而子组件通过$emit来向父组件通信
举个例子:
parent.vue
1
2
3
4
5
6
7
8
9
10
11
12
13
14
15
16
17
18
19
20
21
22
23
24
25
26
27
| <template>
<div>
<p>父级组件</p>
<childen :name="name"
@onUpdateName="onUpdateName"></childen>
</div>
</template>
<script>
import children from "./children";
export default {
components: {
children
},
data() {
return {
name: "shuliqi"
}
},
methods: {
onUpdateName (newName) {
this.name = newName;
}
}
}
</script>
<style>
</style>
|
children.vue
1
2
3
4
5
6
7
8
9
10
11
12
13
14
15
16
17
18
19
20
21
22
23
24
| <template>
<div>
<p>子组件</p>
姓名:{{ name }}
<br>
<button @click="onUpdate">点击更新名字</button>
</div>
</template>
<script>
export default {
props: {
name: String
},
methods: {
onUpdate () {
this.$emit("onUpdateName", "新的名字")
}
}
}
</script>
<style>
</style>
|
注意:在子组件中无法修改父组件传递下来的值(单向数据流)
方式二:$parent/$children
这种方式是个父子组件。我们直接看vue的官方是怎么解释的;
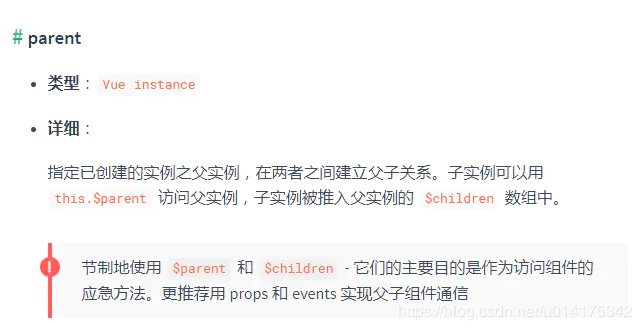
由上面的解释,我们可以知道:通过$parent 和 $children就可以访问组件的实例。拿到实例就可以访问组件的所有方法和data。
我们看看例子:
parent.vue
1
2
3
4
5
6
7
8
9
10
11
12
13
14
15
16
17
18
19
20
21
22
23
24
25
26
27
28
29
30
31
32
33
34
35
36
37
38
39
| <template>
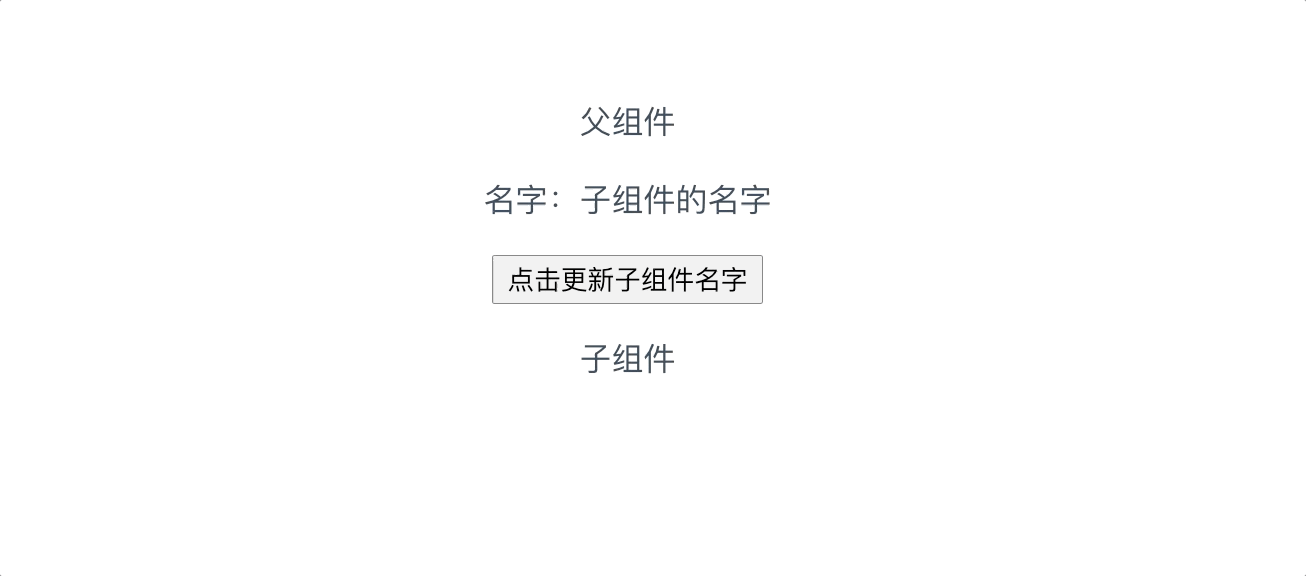
<div>
<p>父组件</p>
<p v-if="isShowChildrenName"> 姓名:{{ this.$children[0].name }}</p>
<button @click="onUpdateChildren">点击更新子组件名字</button>
<children :parentName="name"></children>
</div>
</template>
<script>
import children from "./children";
export default {
components: {
children
},
data() {
return {
name: "父组件的名字",
isShowChildrenName: false
}
},
mounted() {
this.isShowChildrenName = true;
},
methods: {
uodateName(newName) {
this.name = newName;
},
onUpdateChildren() {
console.log(this.$children[0]);
this.$children[0].updateName("新的子组件的名字");
}
}
}
</script>
<style>
</style>
|
children.vue
1
2
3
4
5
6
7
8
9
10
11
12
13
14
15
16
17
18
19
20
21
22
23
24
25
26
27
28
29
30
31
32
33
| <template>
<div>
<p>子组件</p>
<p>姓名:{{ parentName }}</p>
<button @click="onUpdateParent">点击更新父组件名字</button>
</div>
</template>
<script>
export default {
props: {
parentName: String
},
data() {
return {
name: "子组件的名字"
}
},
methods: {
onUpdateParent() {
console.log(this.$parent);
this.$parent.name = "新的父组件的名字";
},
updateName(newName) {
this.name = newName;
}
}
}
</script>
<style>
</style>
|
在父组件中, 我们可以通过this.$children 拿到所有的子实例(注意:this.$children是一个数组,所有子实例的集合)。拿到实例之后可以访问实例的方法和代码。
在子组件中,我们可以通过this.$parent来访问父实例。拿到实例之后就可以访问父实例的方法和data。
注意:在 ·#app·上拿到的$parent得到的是 new Vue()实例。在这实例拿到的$parent是undefined;而在最低层拿到的$children 是空数组。也要注意得到$parent和$children的值不一样,$children 的值是数组,而$parent是个对象
方式三:ref/$refs
ref如果是在普通的元素上使用,引用指向的是DOM元素;如果是用在组件上,引用指向的是组件的实例,可以通过实例直接使用组件上的方法或者访问数据。$refs是所有ref的集合。可通过this.$refs[<ref设置的名字>]来取到相应的实例或者元素。
parent.vue
1
2
3
4
5
6
7
8
9
10
11
12
13
14
15
16
17
18
19
20
21
22
23
24
25
26
27
28
29
30
31
| <template>
<div>
<P>父组件</P>
<p v-if="isShowChildrenName">名字:{{this.$refs.childrenRef.name}}</p>
<button @click="onUpdateChildren">点击更新子组件名字</button>
<children ref="childrenRef"></children>
</div>
</template>
<script>
import children from "./children"
export default {
components: {
children
},
data() {
return {
isShowChildrenName: false
}
},
mounted() {
this.isShowChildrenName = true;
},
methods: {
onUpdateChildren() {
this.$refs.childrenRef.name = "新的组件的名字";
}
}
}
</script>
|
children.vue
1
2
3
4
5
6
7
8
9
10
11
12
13
14
15
16
17
18
19
| <template>
<div>
<P>子组件</P>
</div>
</template>
<script>
export default {
data() {
return {
name:"子组件的名字"
}
},
methods: {
updateName(newName) {
this.name = newName;
}
}
}
</script>
|
方式四:provide/ inject
这是Vue2.2.0增加的api。在父组件通过provide来提供变量。子组件通过inject来注入变量。这里不论子组件的嵌套有多深,只要父组件调用了provide,无论在多深嵌套的子组件中都可以inject数据。
- provide:一个对象或者一个返回一个对象的函数。改对象包含可注入子孙的属性
- inject:一个字符串/数组/对象
例子1:
A.vue
1
2
3
4
5
6
7
8
9
10
11
12
13
14
15
16
17
18
19
| <template>
<div>
<p>我是最上层组件</p>
<B></B>
</div>
</template>
<script>
import B from "./B";
export default {
components: {
B
},
provide: {
name: "父组件的名字"
}
}
</script>
<style>
</style>
|
B.vue
1
2
3
4
5
6
7
8
9
10
11
12
13
14
15
16
| <template>
<div>
<p>我是中间层组件</p>
<C></C>
</div>
</template>
<script>
import C from "./C";
export default {
components: {
C
},
}
</script>
<style>
</style>
|
C.vue
1
2
3
4
5
6
7
8
9
10
11
12
13
| <template>
<div>
<p>我是最底层组件</p>
<p>最上层组件的name值:{{ name }}</p>
</div>
</template>
<script>
export default {
inject: ["name"]
}
</script>
<style>
</style>
|
最后我们页面是这样的:

我们可以看出来,在父组件provide一个name属性。在C.vue组件是可以inject到的。
但是现在有个问题: 我们父组件provide的name是固定的一个字符串。但是想要provide的属性是响应式的,这能做到的吗?我们看官方的解释:
provide 和 inject 绑定并不是可响应的。这是刻意为之的。然而,如果你传入了一个可监听的对象,那么其对象的 property 还是可响应的。
那我们父组件改成这样是不是就可以了?
1
2
3
4
5
6
7
8
9
10
11
12
13
14
15
16
17
18
19
20
21
22
23
24
25
26
27
28
29
30
31
32
| <template>
<div>
<p>我是最上层组件</p>
<B></B>
<button @click="onUpdateParent">点击最上层组件名字</button>
</div>
</template>
<script>
import B from "./B";
export default {
components: {
B
},
data() {
return {
name: "父组件的名字"
}
},
provide() {
return {
name: this.name
}
},
methods: {
onUpdateParent() {
this.name = "最上层组件的新的名字呀"
}
}
}
</script>
<style>
</style>
|
经过验证,子组件页面都没办法实现响应更新this.name值。可能是我们对官方的解释有点误解;
如果把函数赋值给provide的一个属性,这个函数返回父组件动态的数据,然后在子组件调用函数。是不是就可以了?
答案是可以的因为这种方式的函数是保存了父组件的实例的引用,这样子组件每次拿到的数据就是最新的了
最终需要修改的组件代码如下:
A.vue
1
2
3
4
5
6
7
8
9
10
11
12
13
14
15
16
17
18
19
20
21
22
23
24
25
26
27
28
29
30
31
32
| <template>
<div>
<p>我是最上层组件</p>
<B></B>
<button @click="onUpdateParent">点击最上层组件名字</button>
</div>
</template>
<script>
import B from "./B";
export default {
components: {
B
},
data() {
return {
name: "父组件的名字"
}
},
provide() {
return {
getName: () => this.name
}
},
methods: {
onUpdateParent() {
this.name = "最上层组件的新的名字呀"
}
}
}
</script>
<style>
</style>
|
C.vue
1
2
3
4
5
6
7
8
9
10
11
12
13
14
15
16
17
18
| <template>
<div>
<p>我是最底层组件</p>
<p>最上层组件的name值:{{ name }}</p>
</div>
</template>
<script>
export default {
inject: ["getName"],
computed: {
name () {
return this.getName();
}
}
}
</script>
<style>
</style>
|
结果:
可以看出来,子组件得到响应的数据了。
方案五:eventBus
eventBus又称为事件总线,在Vue中可以使用它来作为沟通桥梁的概念,就像是所有组件公用相同的事件中心,可以向该中心注册发送事件/接受事件,组件也可以通知其他组件。
缺点:当项目比较大的时候,就容易造成难以维护的灾难。
这种方式既适合父子组件也适合兄弟组件以及嵌套很深的组件,本例子是拿的兄弟组件来说明
那么如何使用eventBus呢?具体的来说可以有以下这几个步骤:
初始化
首先创建一个事件总线并将其导出,以便于其他模块可以使用或者监听它。
1
2
3
4
5
|
// 初始化事件总线,并将其导出
import Vue from "vue";
export default new Vue();
|
发送和接受事件
A.vue
1
2
3
4
5
6
7
8
9
10
11
12
13
14
15
16
| <template>
<div>
<B></B>
<C></C>
</div>
</template>
<script>
import B from "./B";
import C from "./C";
export default {
components: {
B,
C
}
}
</script>
|
A组件引入了B,C组件,为兄弟组件
B.vue
1
2
3
4
5
6
7
8
9
10
11
12
13
14
15
16
17
18
19
20
21
22
23
24
25
26
27
28
| <template>
<div>
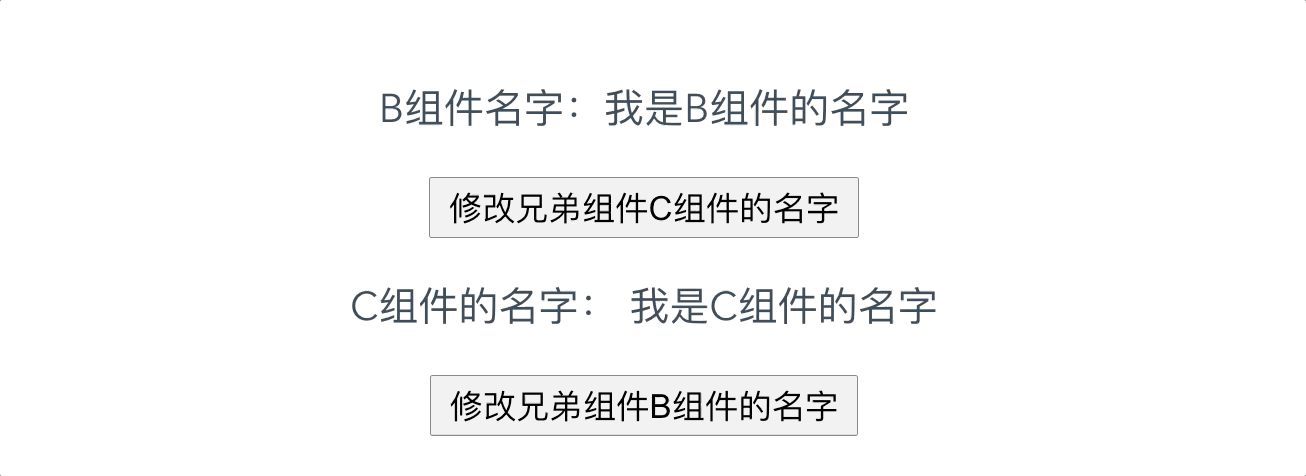
<P>B组件名字:{{ name }}</P>
<button @click="onUpdateNameOfC">修改兄弟组件C组件的名字</button>
</div>
</template>
<script>
import eventBus from "./eventBus";
export default {
data() {
return {
name: "我是B组件的名字"
}
},
methods: {
onUpdateNameOfC() {
eventBus.$emit("updateNameByB", "我的 B组件,触发 C组件 的事件去修改name");
}
},
mounted() {
eventBus.$on("updateNameByC", (newName) => {
this.name = newName;
});
}
}
</script>
|
B组件发送了updateNameByB事件和接收(监听)了updateNameByC组件
C.vue
1
2
3
4
5
6
7
8
9
10
11
12
13
14
15
16
17
18
19
20
21
22
23
24
25
26
27
28
| <template>
<div>
<P>C组件的名字: {{ name }}</P>
<button @click="onUpdateNameOfB">修改兄弟组件B组件的名字</button>
</div>
</template>
<script>
import eventBus from "./eventBus";
export default {
data() {
return {
name: "我是C组件的名字"
}
},
methods: {
onUpdateNameOfB() {
eventBus.$emit("updateNameByC", "我的 C组件,触发 B组件 的事件去修改name");
}
},
mounted() {
eventBus.$on("updateNameByB", (newName) => {
this.name = newName;
})
}
}
</script>
|
C组件发送了updateNameByC事件和接收(监听)了updateNameByB组件
我们来看着例子的最终结果:
方式六:$attrs/$listeners
在Vue2.4中引入了$attrs和$listeners。父作用域中不作为prop被识别(且获取)的特定绑定(除了 class和style),将会”回退“且作为普调的HTML特性应用在子组件的根元素上。
A.vue
1
2
3
4
5
6
7
8
9
10
11
12
13
14
15
16
17
18
19
20
21
22
23
24
25
26
27
28
29
30
31
32
| <template>
<div>
<B :name="name"
:age="age"
:sex="sex"
@updateName="updateName"
:class="isActive"
:style="isStyle"></B>
</div>
</template>
<script>
import B from "./B";
export default {
components: {
B,
},
data() {
return {
name: "shuliqi",
age:18,
sex: "女",
isActive: "isActive",
isStyle: "color: red"
}
},
methods: {
updateName(name) {
this.name = name;
}
}
}
</script>
|
B.vue
1
2
3
4
5
6
7
8
9
10
11
12
13
14
15
16
| <template>
<div>
<C v-bind="$attrs" v-on="$listeners"></C>
</div>
</template>
<script>
import C from "./C";
export default {
components: {
C
},
props: {
age: Number
}
}
</script>
|
C.vue
1
2
3
4
5
6
7
8
9
10
11
12
13
14
15
16
17
18
19
20
21
22
23
24
| <template>
<div>
<p>名字:{{ name }}</p>
<button @click="onUpdateName">点击更新最上层的name值</button>
</div>
</template>
<script>
export default {
props: {
name,
},
created() {
console.log("this.$attrs:",this.$attrs);
console.log("this.$listeners:",this.$listeners);
},
methods: {
onUpdateName() {
this.$listeners.updateName("新的名字")
}
}
}
</script>
|
在上面这个例子中:
A组件向B组件传递了name,age,sex。绑定class值为isActive的值,绑定的style值为``isStyle`的值。
B组件中使用v-bind="$attrs 将父级传下来的值传给C 组件(不包含class。style和在组件中使用props接收的值)props接收了age值,说明VM.$attrs`将不包含这个值。
C组件使用props接收name值,说明VM.$attrs将不包含这个值。在生命周期打印$attrs)和$listeners。
最后有一个更新按钮去触发this.$listeners.updateName("新的名字")A组件的事件去修改name值
最后我们来看结果:
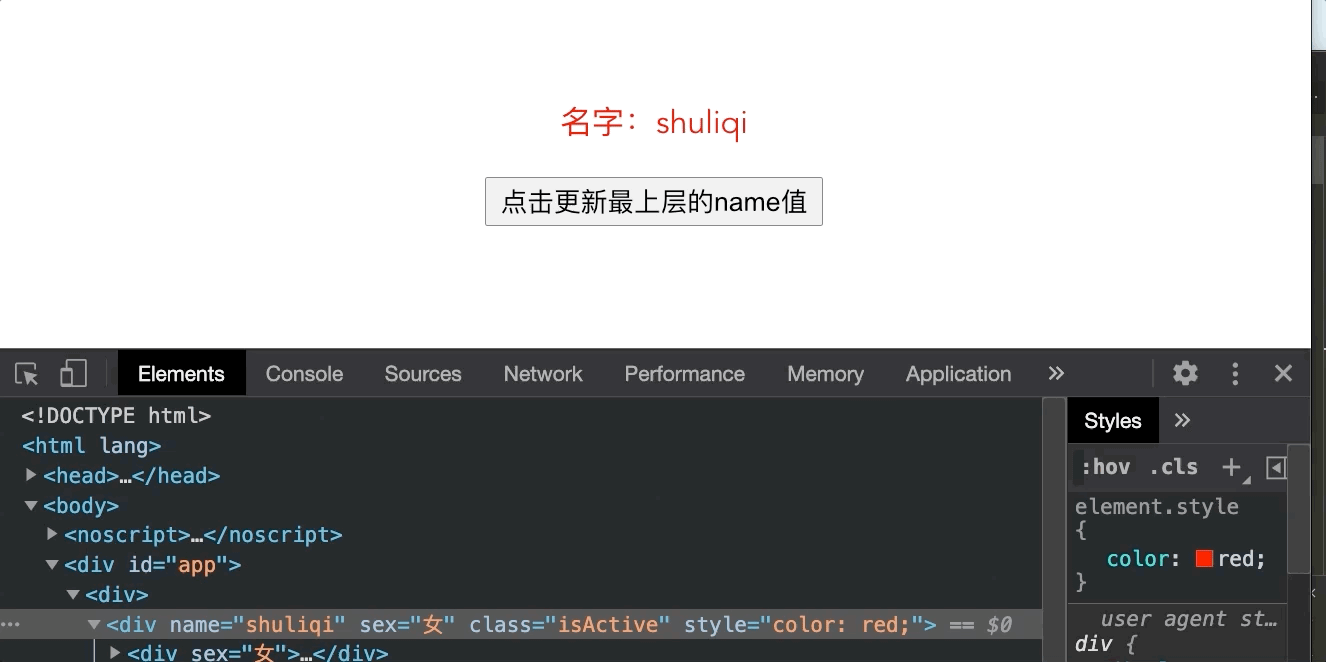
结果是符合我们预期的,这种方式的通信还是挺好的
最后 以上的例子柯点击:shuliqi/**vue-communication**。查看的时候,可以通过切换App.vue不同的通讯方式的文件来体验: