在JavaScript中, 我们最常用的是数据结构应该是数组。但是对其他很多的编程语言来说,数组不是最佳的数据结构, 因为在其他的很多编程语言中,数组的长度是固定,如果数组的数据已经填满,再要加入新的数据就很困难。对于数组的删除和添加操作,通常需要将数组中的其他元素向后移或者向前移动,这些操作就很繁琐。
在JavaScript中,数组是不存在上述的问题的,是因为在JavaScript实现的时候被实现成了对象,但是这样设计之后JavaScript中的数组就会比其他语言的效率低很多。
这时,就可以使用链表来代替它,它对数据是可以随机访问,并且链表可以在任何可以使用一维数组的情况中。
链表分成了很多种类:单向链表,双向链表,单向循环链表,双向循环链表。下面我们来实现一个单向链表,因为单向链表的使用最为广泛。
链表的定义
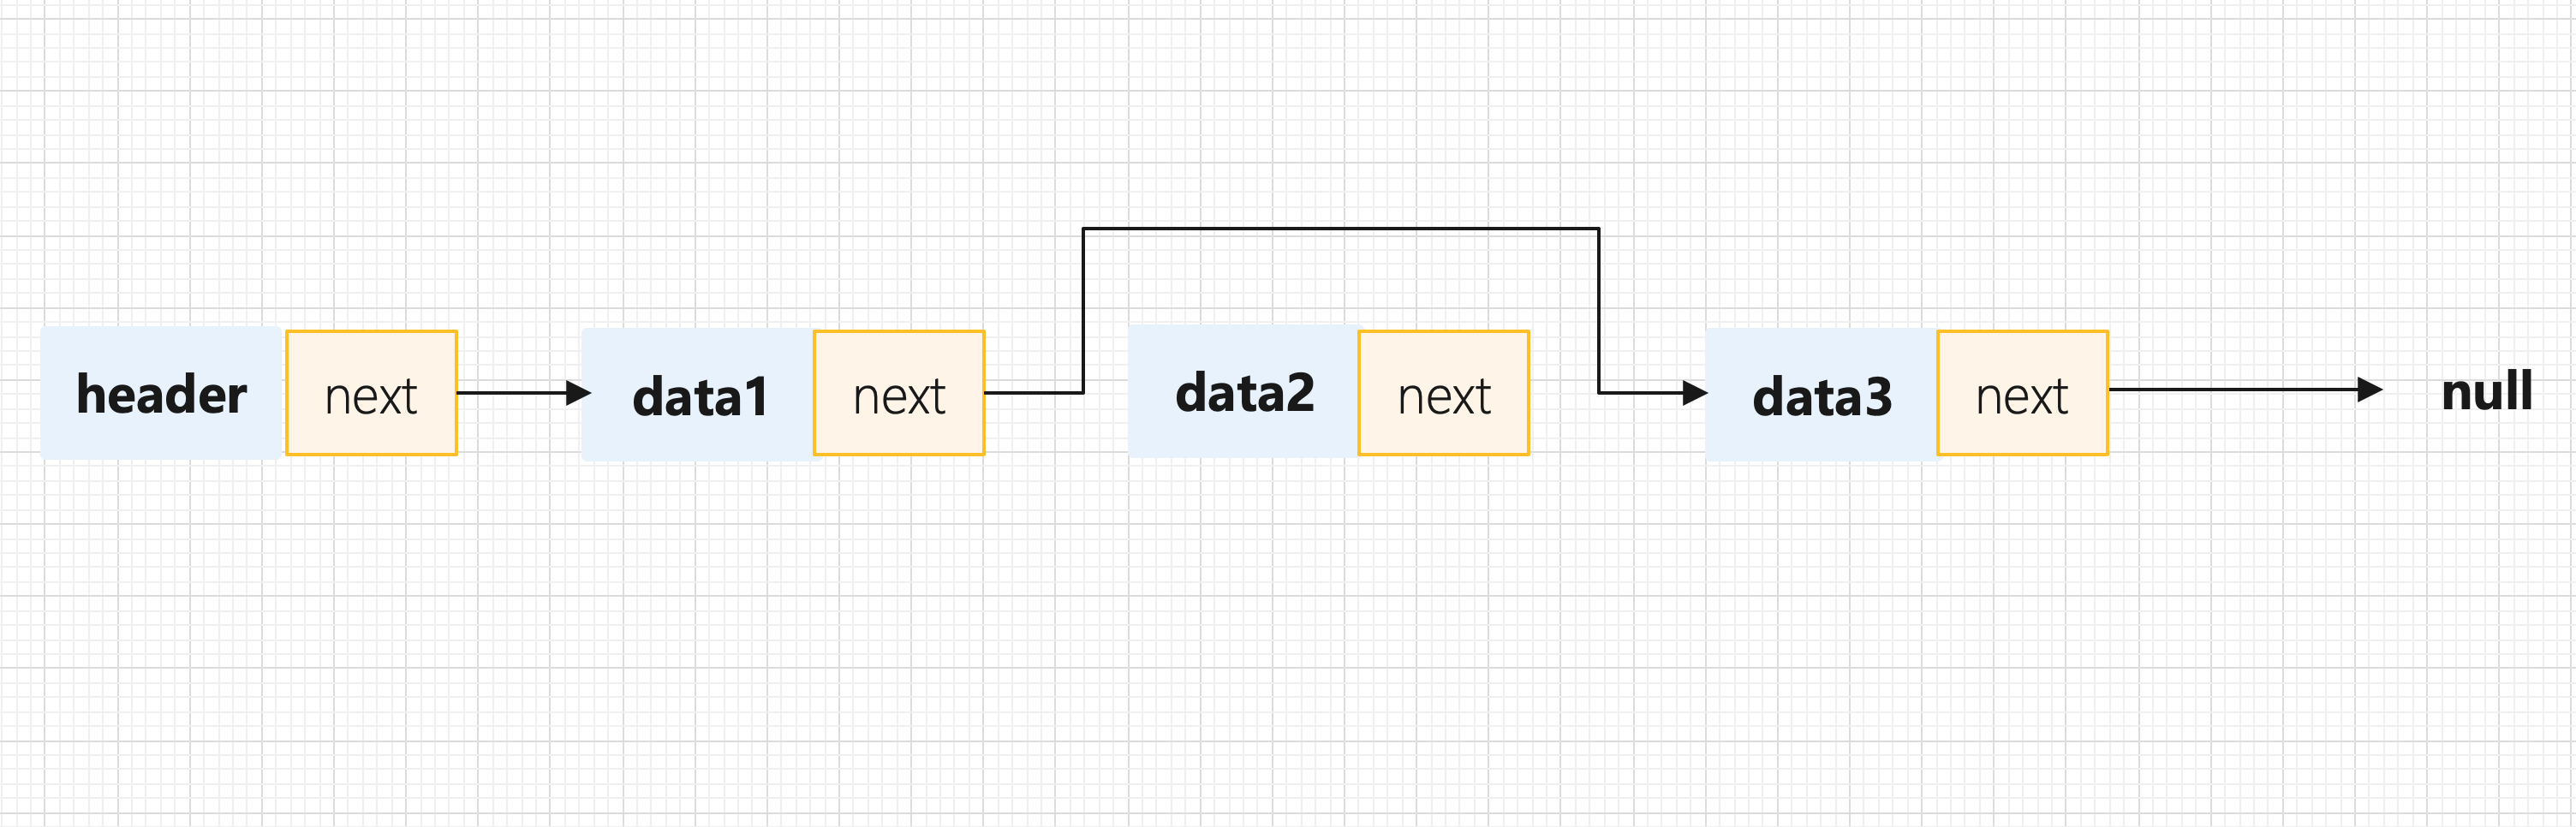
链表是一组节点组成的集合,每个节点有一个对象的引用来指向的它的后一个节点,指向另外一个节点的引用,我们叫做链。我们看下面的;链表结构图:
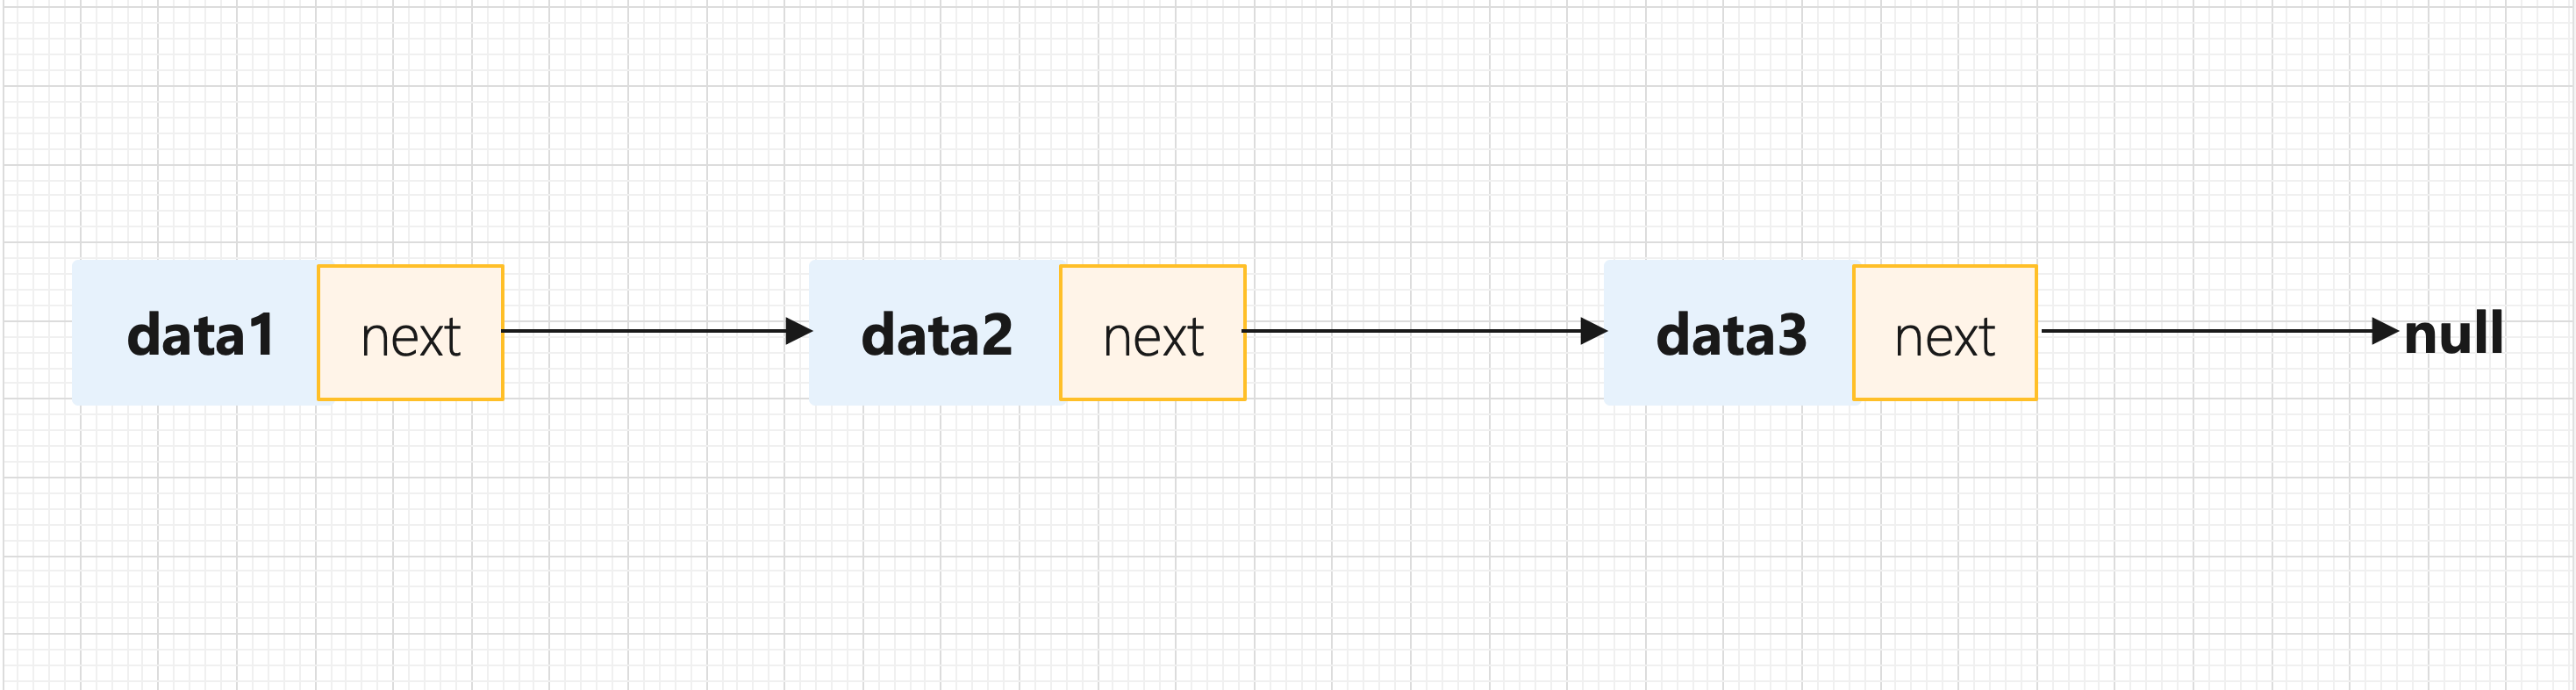
data中存的数据,next保存着下一个链表的引用。在上面的图中,我们只能说data2跟在data1 后面,而不能说data2是链表的第二个元素。data3的next指向了null,表示链表的结束的位置。
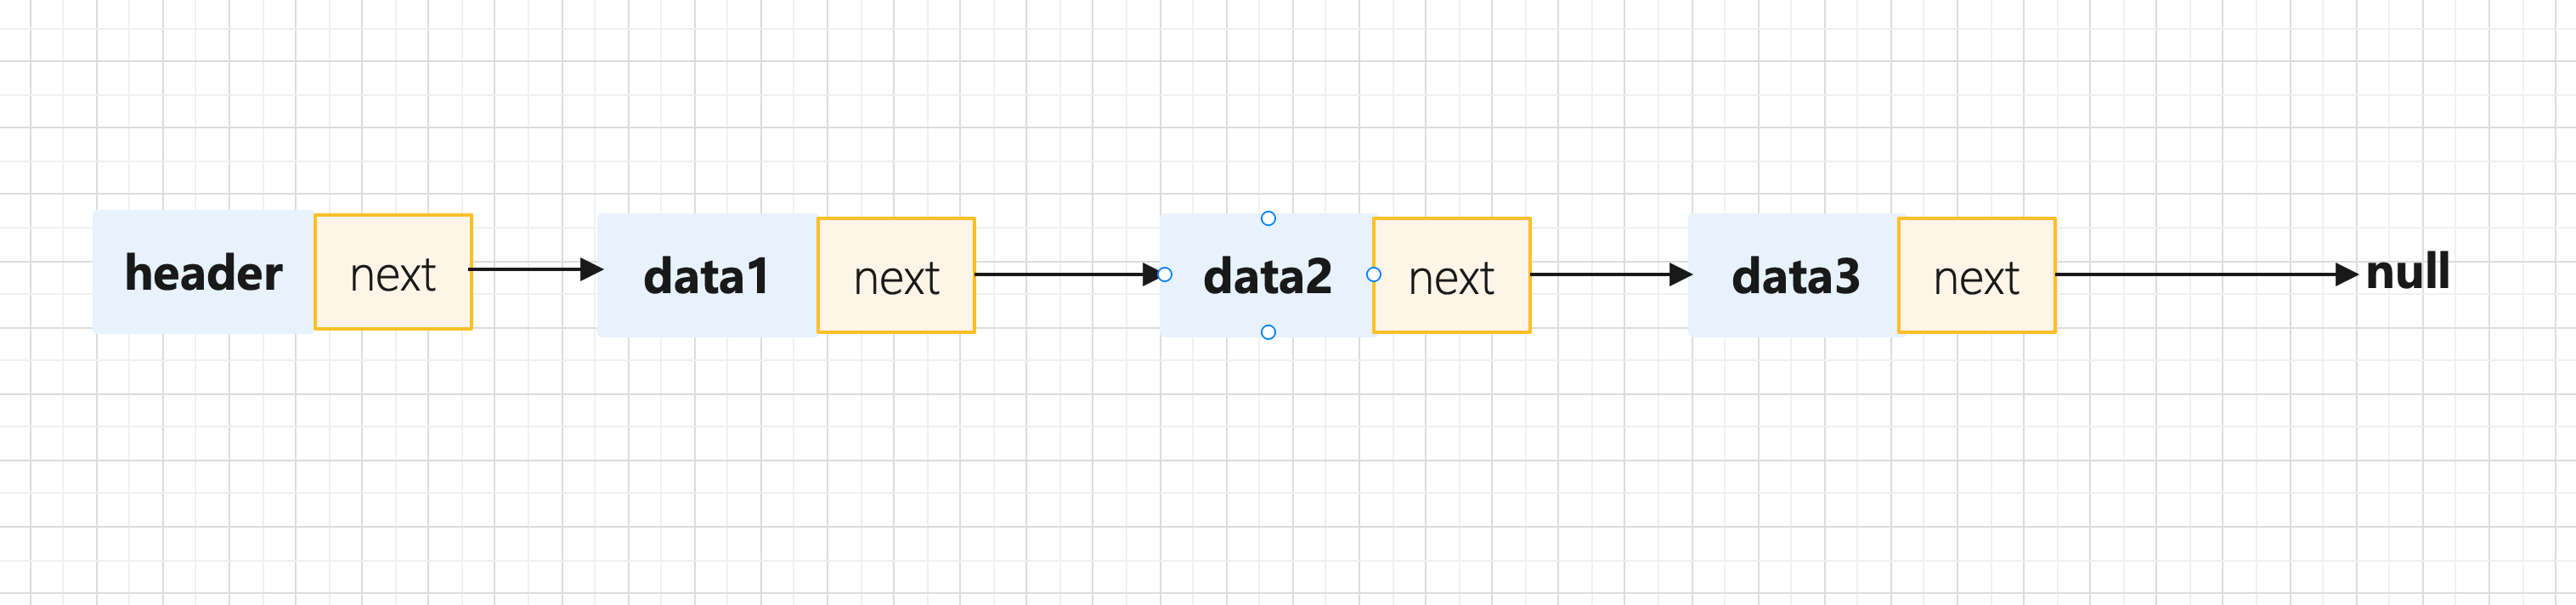
因为链表的起点的确定比较麻烦,所有很多链表的是实现都会在链表的最前面添加一个特殊的节点,我们成为头节点, 表示链表的头部。如下图是表示有头节点的链表:
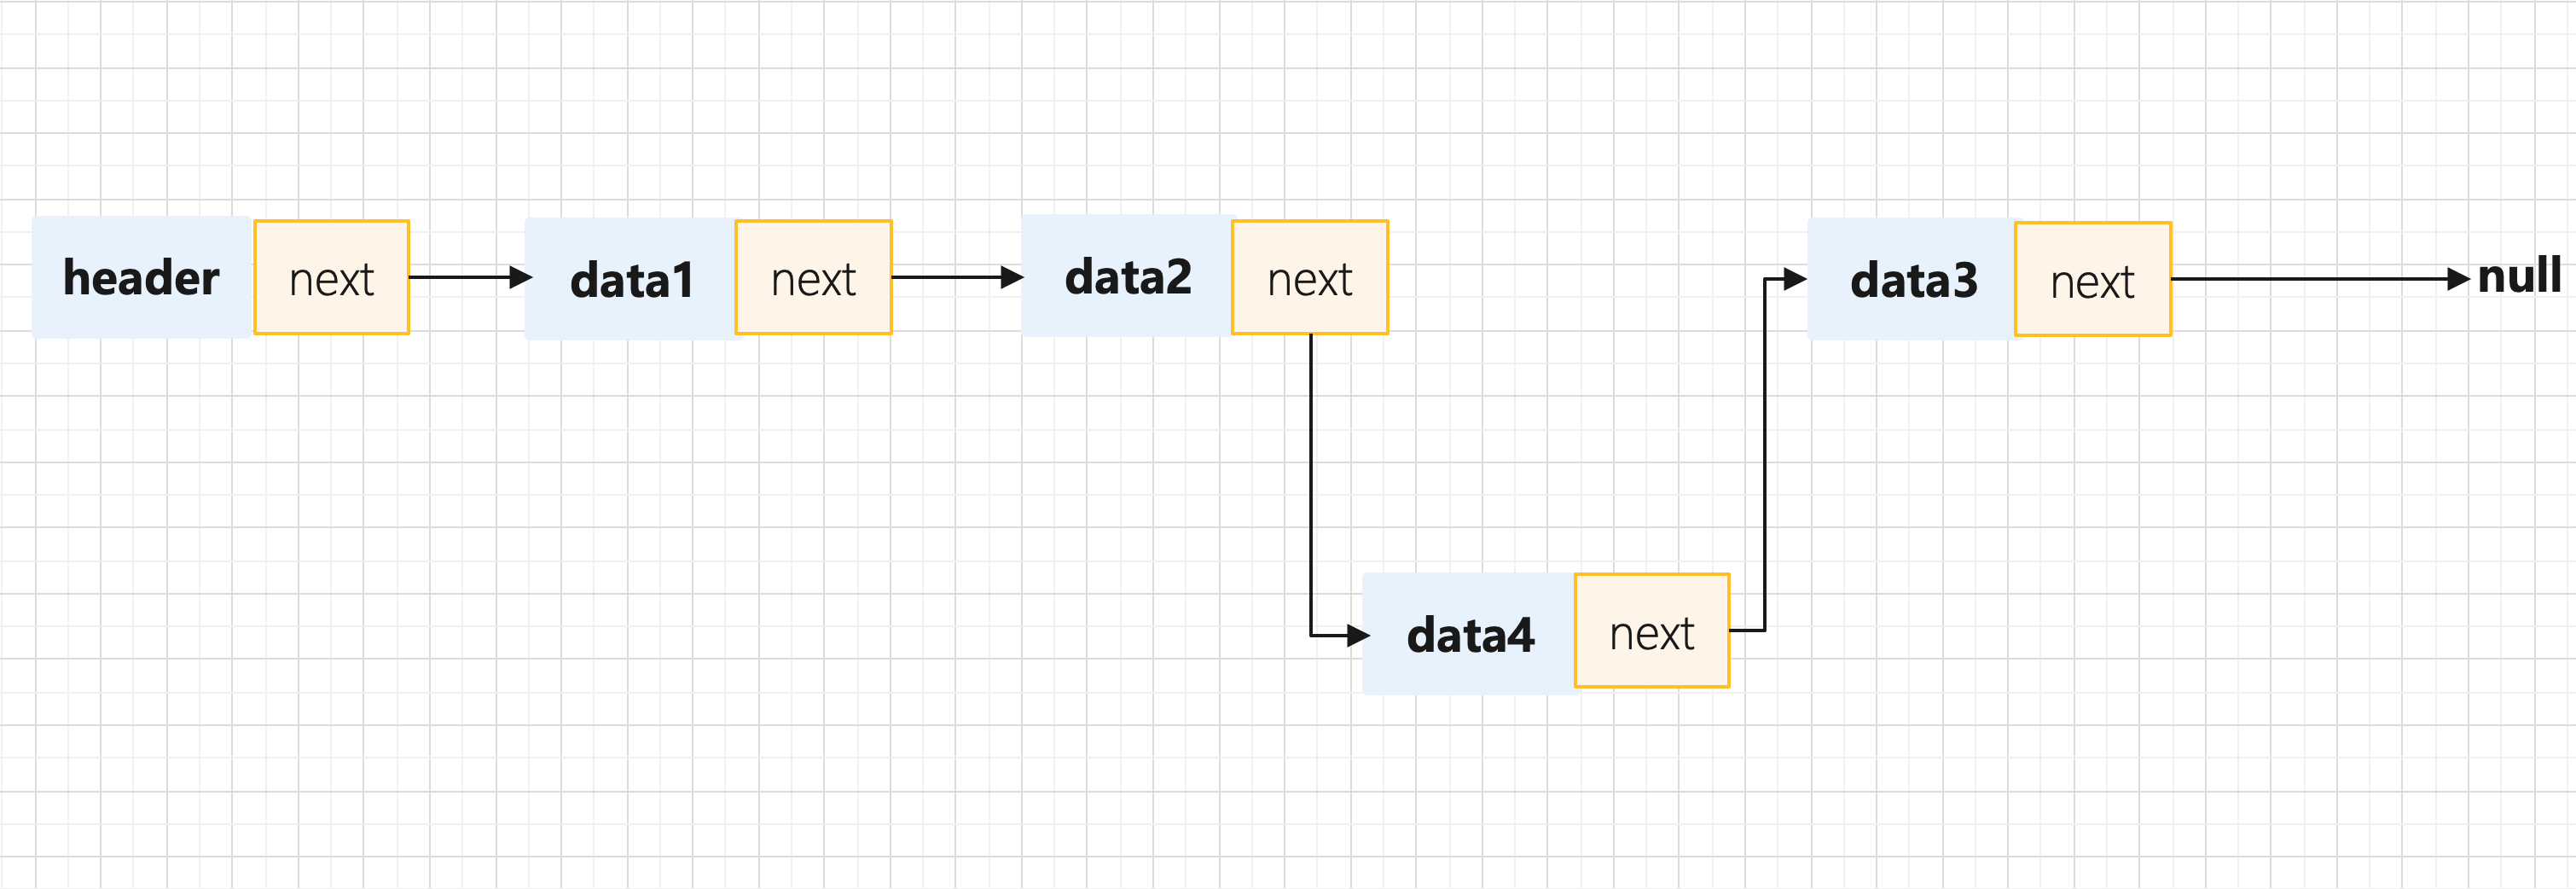
向链表插入一个节点的效率是很高的,只需要修改它前面的节点,使指向新加入的的节点,而新加入的节点指向原来节点指向的节点即可。如下图:
在链表中删除一个节点也很简单,只需要将待删除节点的前节点的指向待删除节点指向的节点即可。 如下图:
实现单向链表
实现链表要设计两个类,一个 Node类来表示节点,另外一个是LinkedList类来生成链表及其操作链表的方法。
Node 节点
Node类包含两个属性, data表示当前节点的数据,next用来保存下一个节点的链接。我们来具体实现以下:
1
2
3
4
5
6
7
|
class Node {
constructor (data) {
this.data = data;
this.next = null;
}
}
|
LinkedList类
LinkedList类只有一个属性,就是使用一个Node对象来表示链表的头节点。LinkedList类的构造函数如下:
1
2
3
4
5
6
7
8
|
class LinkedList {
constructor () {
this.head = new Node("head");
}
}
|
头节点head初始化的next指向null,当有新的元素插入的时候, 会指向新的元素节点。
LinkedList类除了有一个头节点的属性之外,还提供对链表进行操作的方法如:查找给定节点,删除指定节点,插入节点等操作,下面我们一一来实现
查找给定的节点
查找一个指定的节点,我们需要循环连链表,所有刚开始我们创建一个新节点, 将链表的头节点赋值给新节点,然后循环链表,如果当前节点的data属性跟我们要查找的信息不符合,则将当前节点的移动到下一个节点。如果查找成功, 则返回包含这个数据的这个节点。否则返回null。
1
2
3
4
5
6
7
8
9
10
11
12
13
|
find(data) {
let currentNode = this.head;
while (currentNode && currentNode.data != data) {
currentNode = currentNode.next;
}
return currentNode;
}
|
插入新的节点
想要插入新的节点, 我们就需要要在哪个节点(节点前面或者节点后面)插入,我们这里的示例是在节点的后面插入一个新的节点。在一个已知节点的后面插入节点, 首先我们先找到该节点。一旦找到了节点,我们就可以将新节点插入到链表中,我们将新节点的next属性指向查找到节点的next指向的节点。然后将查找的节点的next指向新节点。
1
2
3
4
5
6
7
8
9
10
11
12
13
14
15
|
insert(newData, data) {
const currentNode = this.find(data);
const newNode = new Node(newData);
newNode.next = currentNode.next;
currentNode.next = newNode;
}
|
查找一个节点的的前节点
1
2
3
4
5
6
7
8
|
findPrev(data) {
let currentNode = this.head;
while( currentNode.next && currentNode.next.data !== data) {
currentNode = currentNode.next;
}
return currentNode;
}
|
删除节点
从链表中删除一个节点,需要找到待删除节点的前一个节点,找到后将它的next属性不在指向待删除的节点,而是指向待删除节点的下一个节点。
1
2
3
4
5
6
7
8
9
10
11
12
13
|
remove(removeData) {
const preNode = this.findPrev(removeData);
if (preNode.next !== null) {
const removeNode = this.find(removeData);
preNode.next = removeNode.next;
}
}
|
打印节点的数据
1
2
3
4
5
6
7
8
|
display() {
let currentNode = this.head;
while( currentNode && currentNode.next ) {
console.log(currentNode.next.data);
currentNode = currentNode.next;
}
}
|
最后放上我们整体的代码:
1
2
3
4
5
6
7
8
9
10
11
12
13
14
15
16
17
18
19
20
21
22
23
24
25
26
27
28
29
30
31
32
33
34
35
36
37
38
39
40
41
42
43
44
45
46
47
48
49
50
51
52
53
54
55
56
57
58
59
60
61
62
63
64
65
66
67
68
69
70
71
72
73
74
|
class Node {
constructor (data) {
this.data = data;
this.next = null;
}
}
class LinkedList {
constructor () {
this.head = new Node("head");
}
find(data) {
let currentNode = this.head;
while (currentNode && currentNode.data != data) {
currentNode = currentNode.next;
}
return currentNode;
}
insert(newData, data) {
const currentNode = this.find(data);
const newNode = new Node(newData);
newNode.next = currentNode.next;
currentNode.next = newNode;
}
findPrev(data) {
let currentNode = this.head;
while( currentNode.next && currentNode.next.data !== data) {
currentNode = currentNode.next;
}
return currentNode;
}
remove(removeData) {
const preNode = this.findPrev(removeData);
if (preNode.next !== null) {
const removeNode = this.find(removeData);
preNode.next = removeNode.next;
}
}
display() {
let currentNode = this.head;
while( currentNode && currentNode.next ) {
console.log(currentNode.next.data);
currentNode = currentNode.next;
}
}
}
|
我们来检测一下是否正确:
1
2
3
4
5
6
7
8
9
| const linked = new LinkedList();
linked.insert('1', 'head');
linked.insert('2', '1');
linked.insert('3', '2');
linked.insert('4', '3');
linked.display();
linked.remove('2');
console.log("------");
linked.display();
|
打印的结果如下:
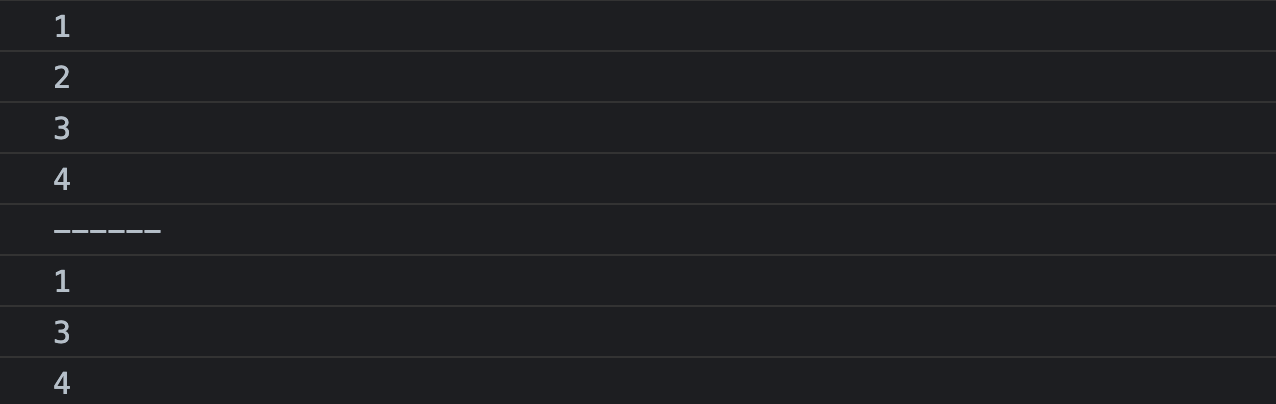
可见,成功实现了一个单向链表
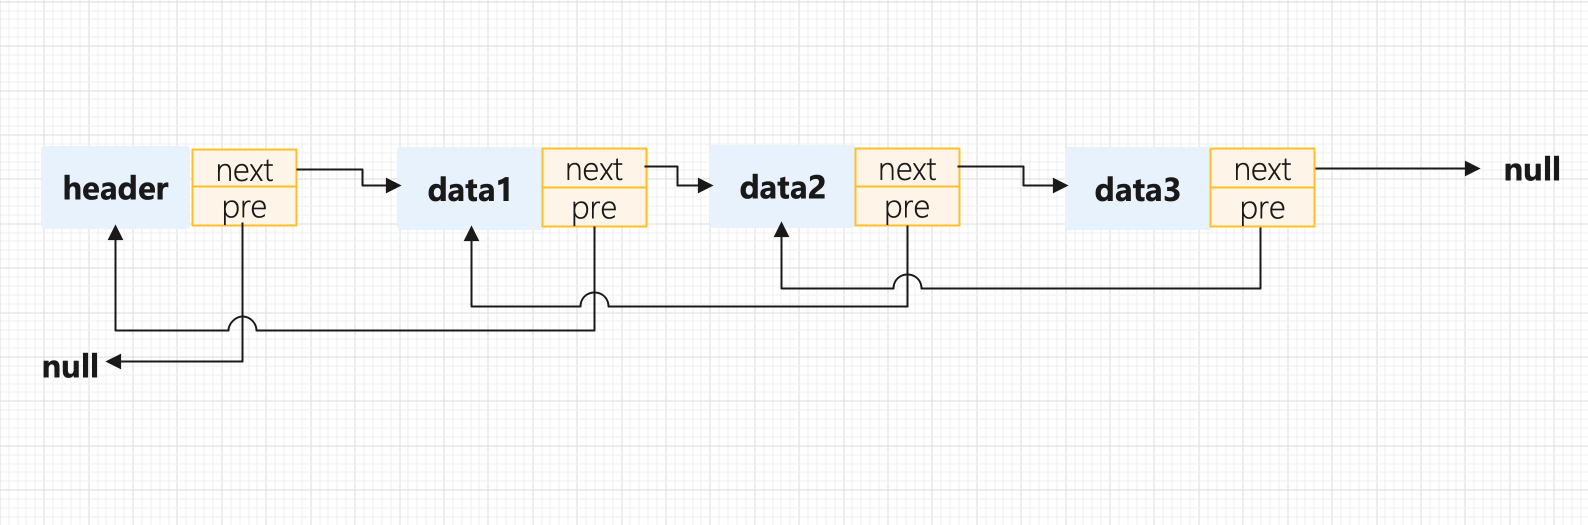
双向链表
单向链表从头节点来时遍历链表很简单,但是反过来,从后往前遍历却是不容易的。但是我们给Node类添加一个pre属性,让它指向前驱节点的链接。这从后往前遍历不就简单了吗?是的,是变得简单了。这种就形成了双向链表,如图:
双向链表插入一个节点的话就需要更新next和 pre 属性了。会显得麻烦点, 但是删除节点的效率更高了。不需要查找待删除节点的前一个前节点了。
实现双向链表
要实现双向链表,首先先给Node节点添加一个pre属性。
1
2
3
4
5
6
7
8
9
|
class Node {
constructor (data) {
this.data = data;
this.next = null;
this.pre = null
}
}
|
双向链表的够构造函数:
1
2
3
4
5
6
|
class LlinkedList {
constructor() {
this.head = new Node("head");
}
}
|
查找一个节点
双向链表查找一个节点的方式和单向链表的方式是一样的
1
2
3
4
5
6
7
8
9
10
11
12
13
14
|
find(data) {
let currentNode = this.head;
while (currentNode && currentNode.data != data) {
currentNode = currentNode.next;
}
return currentNode;
}
|
插入一个节点
双向链表的插入一个节点的时候还需要设置新节点的pre属性。
1
2
3
4
5
6
7
8
9
10
11
12
13
14
15
|
insert(newData, currentData) {
const newNode = new Node(newData);
const currentNode = this.find(currentData);
newNode.next = currentNode.next;
newNode.pre = currentNode;
currentNode.next = newNode;
}
|
删除一个节点
双向链表的删除节点比单向链表的效率要高, 只要找出待删除的节点就可以了。然后将该节点的前驱 next 属性指向待删除节点的后继,设置该节点后继 pre 属性,指向待删除节点的前驱即可
1
2
3
4
5
6
7
8
9
10
11
|
remove(removeData) {
const removeNode = this.find(removeData);
if (removeNode.next !== null) {
removeNode.pre.next = removeNode.next;
removeNode.next.pre = removeNode.pre;
}
}
|
查找链表中的最后一个元素
1
2
3
4
5
6
7
8
9
10
|
findLast() {
let currentNode = this.head;
while(currentNode.next != null) {
currentNode = currentNode.next;
}
return currentNode;
}
|
反向打印链表的数据
1
2
3
4
5
6
7
8
9
10
11
|
displayReverse() {
let currentNode = this.findLast();
while(currentNode.pre !== null ) {
console.log(currentNode.data);
currentNode = currentNode.pre;
}
}
|
此外的display 和单向链表的方式一样。
最后贴上最终的代码
1
2
3
4
5
6
7
8
9
10
11
12
13
14
15
16
17
18
19
20
21
22
23
24
25
26
27
28
29
30
31
32
33
34
35
36
37
38
39
40
41
42
43
44
45
46
47
48
49
50
51
52
53
54
55
56
57
58
59
60
61
62
63
64
65
66
67
68
69
70
71
72
73
74
75
76
77
78
79
80
81
82
83
84
85
86
87
88
89
|
class Node {
constructor (data) {
this.data = data;
this.next = null;
this.pre = null
}
}
class LLinkedList {
constructor() {
this.head = new Node("head");
}
find(data) {
let currentNode = this.head;
while (currentNode && currentNode.data != data) {
currentNode = currentNode.next;
}
return currentNode;
}
insert(newData, currentData) {
const newNode = new Node(newData);
const currentNode = this.find(currentData);
newNode.next = currentNode.next;
newNode.pre = currentNode;
currentNode.next = newNode;
}
remove(removeData) {
const removeNode = this.find(removeData);
if (removeNode.next !== null) {
removeNode.pre.next = removeNode.next;
removeNode.next.pre = removeNode.pre;
}
}
findLast() {
let currentNode = this.head;
while(currentNode.next != null) {
currentNode = currentNode.next;
}
return currentNode;
}
display() {
let currentNode = this.head;
while( currentNode && currentNode.next ) {
console.log(currentNode.next.data);
currentNode = currentNode.next;
}
}
displayReverse() {
let currentNode = this.findLast();
while(currentNode.pre !== null ) {
console.log(currentNode.data);
currentNode = currentNode.pre;
}
}
}
|
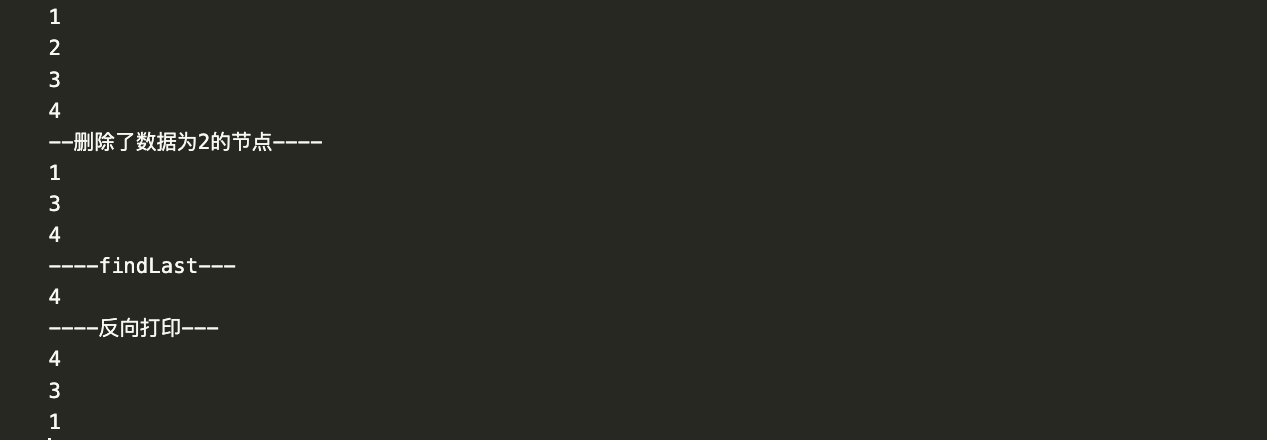
最后我们检测一下:
1
2
3
4
5
6
7
8
9
10
11
12
13
| const linked = new LLinkedList();
linked.insert('1', 'head');
linked.insert('2', '1');
linked.insert('3', '2');
linked.insert('4', '3');
linked.display();
linked.remove('2');
console.log("--删除了数据为2的节点----");
linked.display();
console.log("----findLast---");
console.log(linked.findLast().data);
console.log("----反向打印---");
linked.displayReverse();
|
打印的结果为: